INFO
The Lovrabet upgrade on 2026-08-14 separated development-mode and runtime permissions. App accessibility, menu visibility, and data read/write permissions are managed together under runtime permissions at https://{appCode}.app.lovrabet.com. Production permissions for the app itself (app name, taking the app online/offline, page development, Backend Function development, etc.) remain under development-mode permissions at https://app.lovrabet.com.
<grid> <column width-ratio="0.500000"> Runtime permissions: bottom-left avatar -> App management -> Permissions & user groups 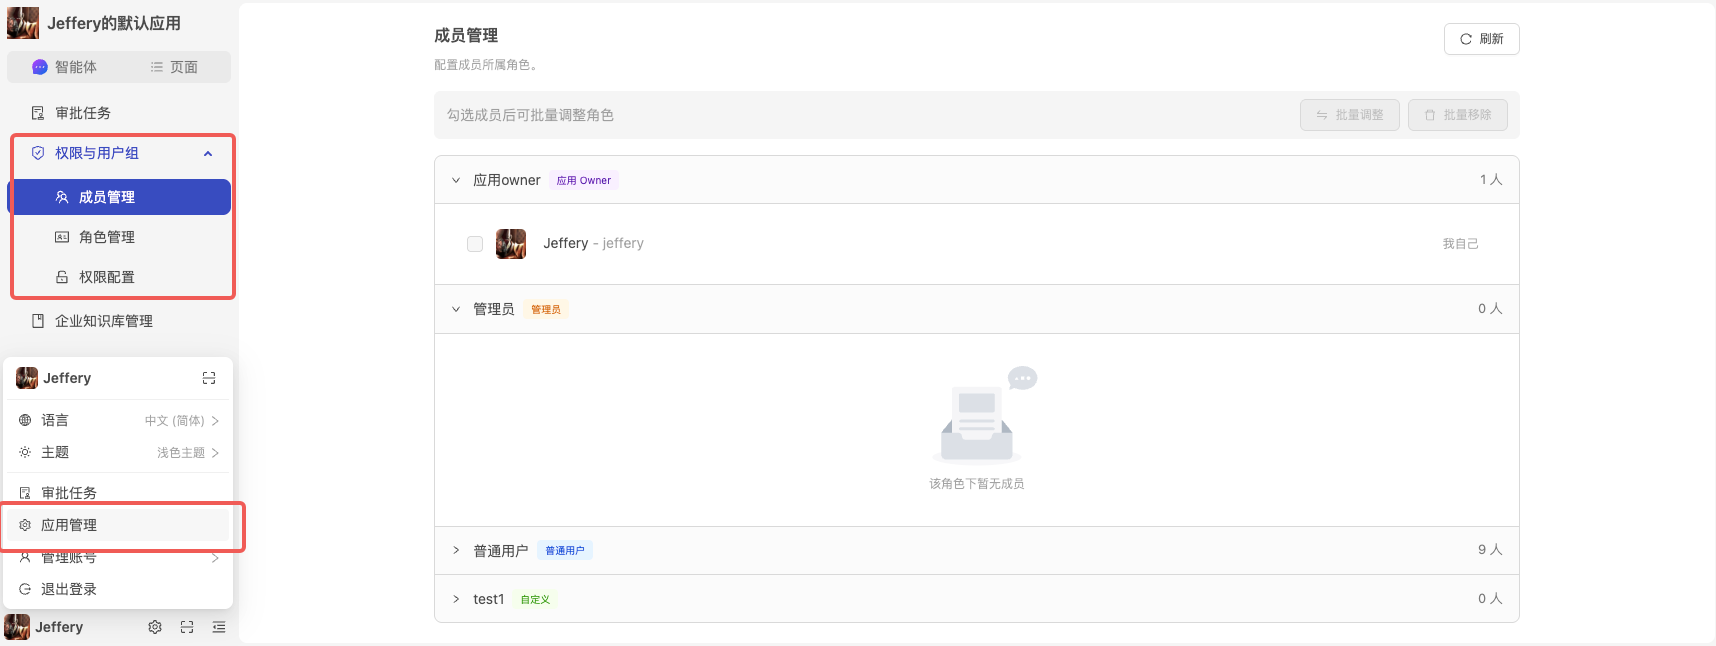
- Requires runtime admin / app owner permissions to use this feature </column> <column width-ratio="0.500000"> Development-mode permissions: App management -> Permissions -> Members
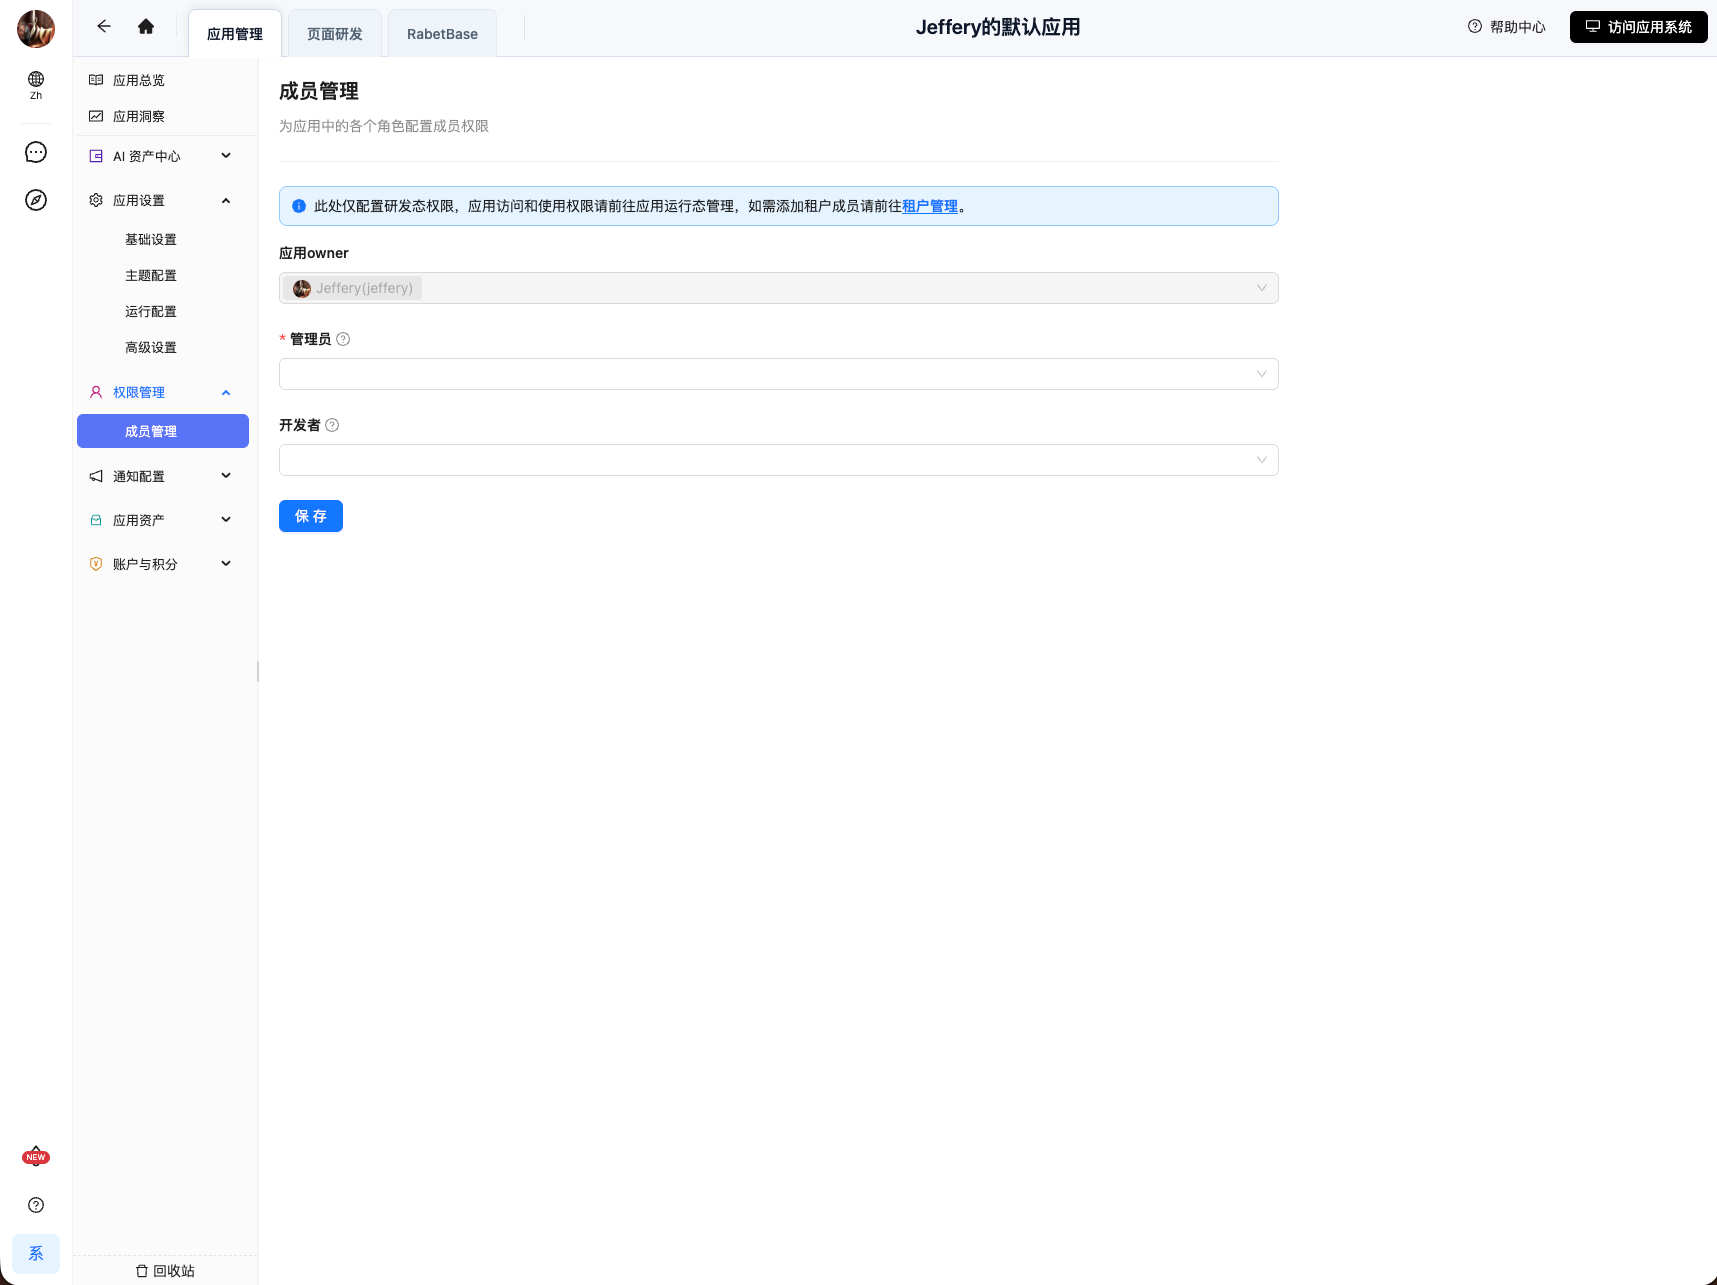
- Requires development-mode admin / app owner permissions to use this feature </column> </grid>
Configuring runtime permissions
Where to find it
Prerequisite: app owner / admin only
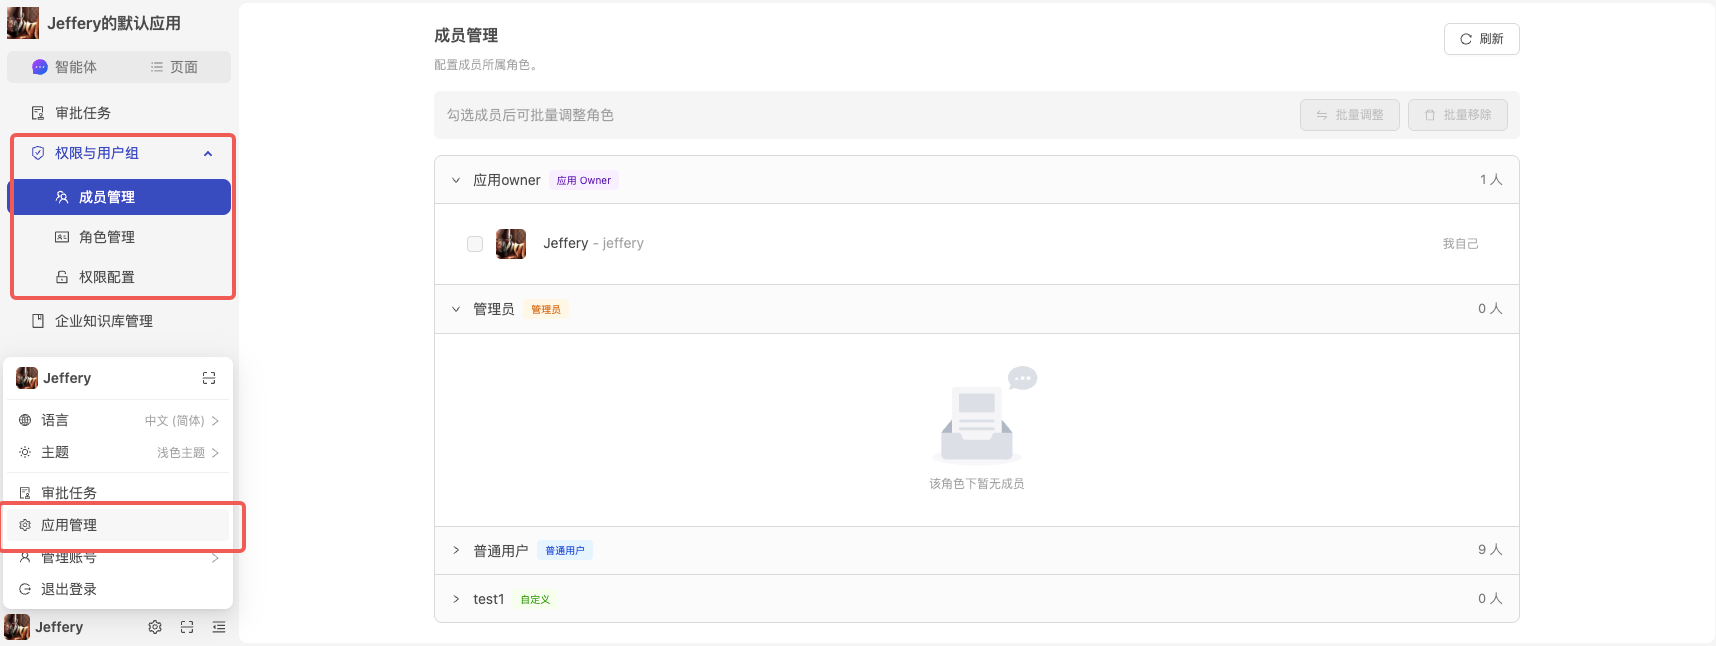
Enter the app runtime -> hover over the avatar at the bottom left -> App management -> Permissions & user groups
Overview
The runtime permission system consists of three modules, matching the three entries on the left of the admin console:
| Module | Route | What it does | |-|-| | Roles | /admin/role | Manage every role in the app (built-in + custom) and view each role's permission details | | Members | /admin/member | Members grouped by role; change roles individually or in bulk, remove members, approve join requests | | Permission config | /admin/permit-config | Configure in bulk which roles can access which resources (menus / datasets) |
There are 5 role types. Four are built-in system roles that cannot be edited or deleted; only custom roles can be created and maintained by app admins.
| Role type | Badge color | Description | Editable |
|---|---|---|---|
| OWNER | ■ Purple | App owner with full permissions; these members cannot have their role changed or be removed | ❌ Built-in |
| ADMIN | ■ Orange | App admin | ❌ Built-in |
| DEV | ■ Cyan | Developer role, usually holding development-related permissions | ❌ Built-in |
| USER | ■ Blue | Regular user role | ❌ Built-in |
| CUSTOM | ■ Green | Custom roles — create as many as you need and assign different permissions | ✅ Create/edit/delete |
Roles
Create a role
Click the + New role button in the top right.
In the dialog, fill in:
- Role name (required, up to 32 characters)
- Remark (optional, up to 200 characters)
On submit, the role type is fixed as CUSTOM.
Edit / delete a role
Only CUSTOM roles show "Edit" and "Delete" buttons in the actions column.
- Deleting a role requires a second confirmation.
- If only one row remains on the current page after a deletion, the page automatically returns to the previous one.
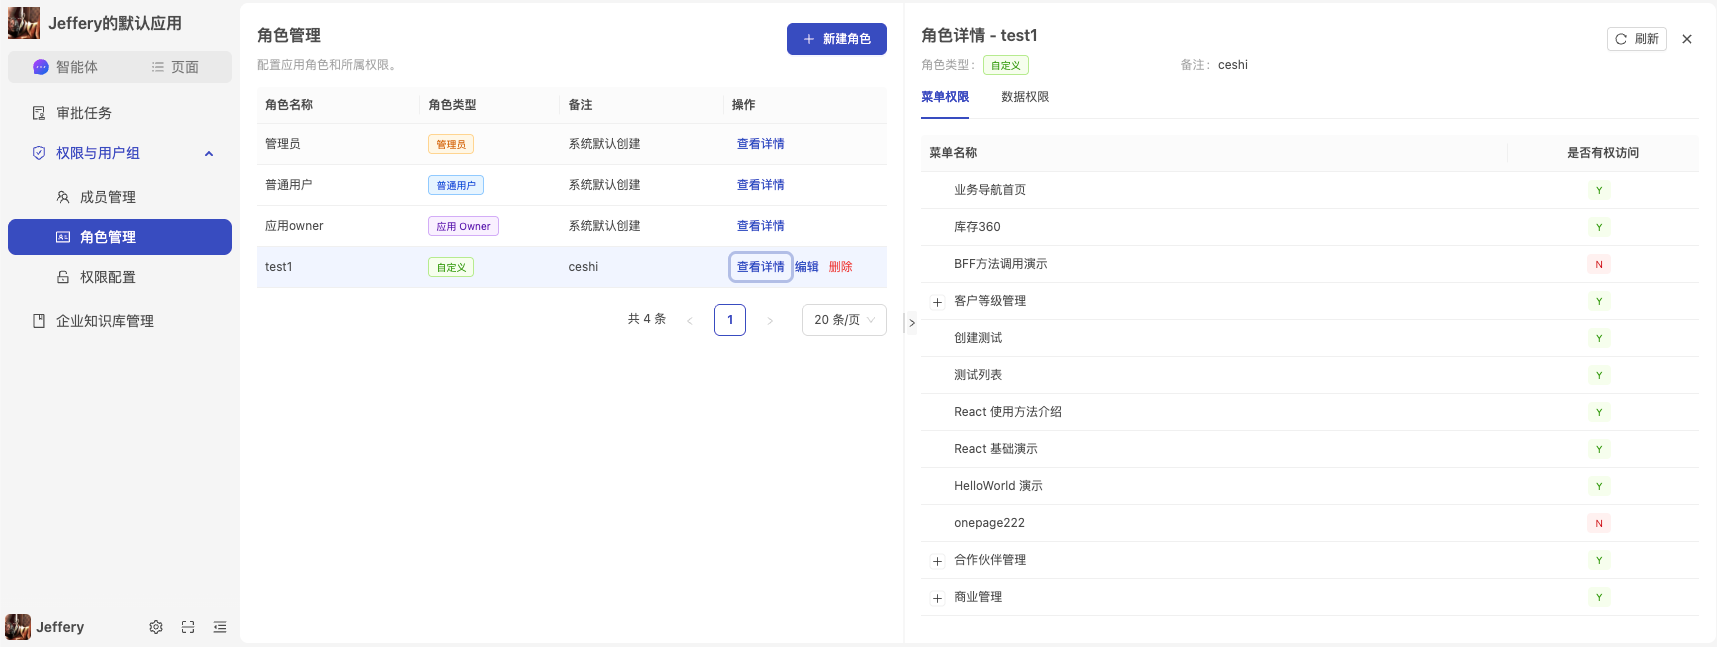
Role details
Click a row in the left list and the role's detail panel opens on the right, containing:
Basics: the role type badge plus the remark.
Menu permissions tab: a tree table, fully expanded by default; each row shows one menu node with an access column.
- Y = access allowed
- N = no access
Data permissions tab: a table with dynamic columns.
- First column = dataset name.
- Remaining columns = the dataset's operation types (e.g., DATA_CREATE / DATA_UPDATE), generated dynamically from what actually exists.
- Cells use the same Y / N badges to indicate access.
TIP
The role detail page is for viewing permissions only. To change permissions, use the "Permission config" page for bulk settings.
Members (/admin/member)
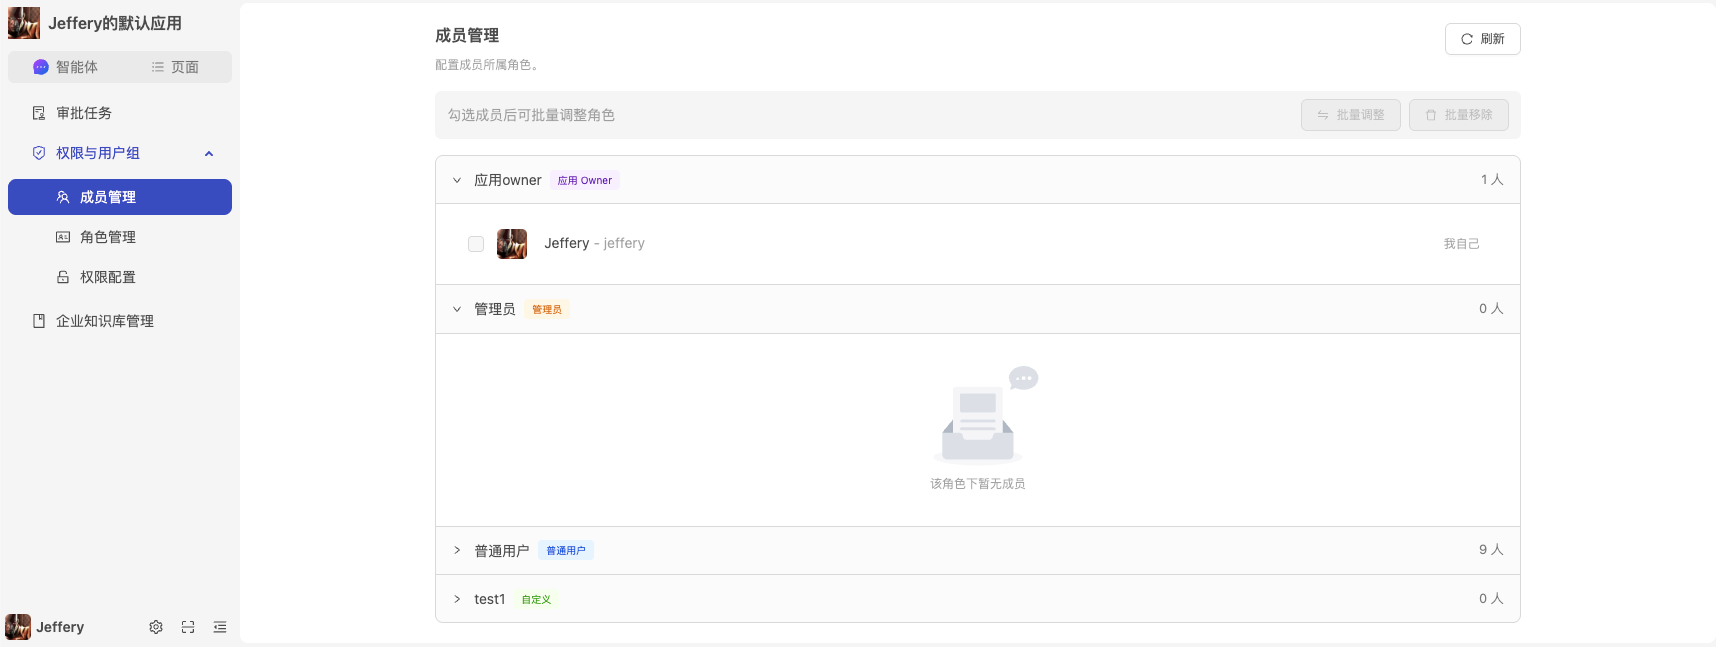
Adjust member permissions in bulk
A bulk action bar sits at the top of the page. After checking users across role groups (OWNER group members and "me" cannot be selected), you can:
Bulk role change:
- Check multiple users and click Change.
- Select the target role in the dialog (OWNER is not selectable).
- On confirm, the selected users are removed from every non-target role group and added to the target group.
Bulk remove:
- Removes the selected users from all role groups, after a second confirmation.
Adjust a single member
Every member entry (non-OWNER, not yourself) provides two action buttons on the right:
- Change role (<swapoutlined/> icon): opens a popover; pick the target role (excluding the current role groups and OWNER) and confirm to move the user from the original group to the target group.
- Remove (<deleteoutlined/> icon): removes the user from all role groups, with a second confirmation.
Approve permission requests
When users apply to join a role, a green ribbon badge at the top of the role group shows the number of applicants. Expand the "Applicants" panel:
- Approve: the user joins the role group and is removed from the applicant list.
- Reject: removed from the applicant list only; the user does not join the role.
Permission config (/admin/permit-config)
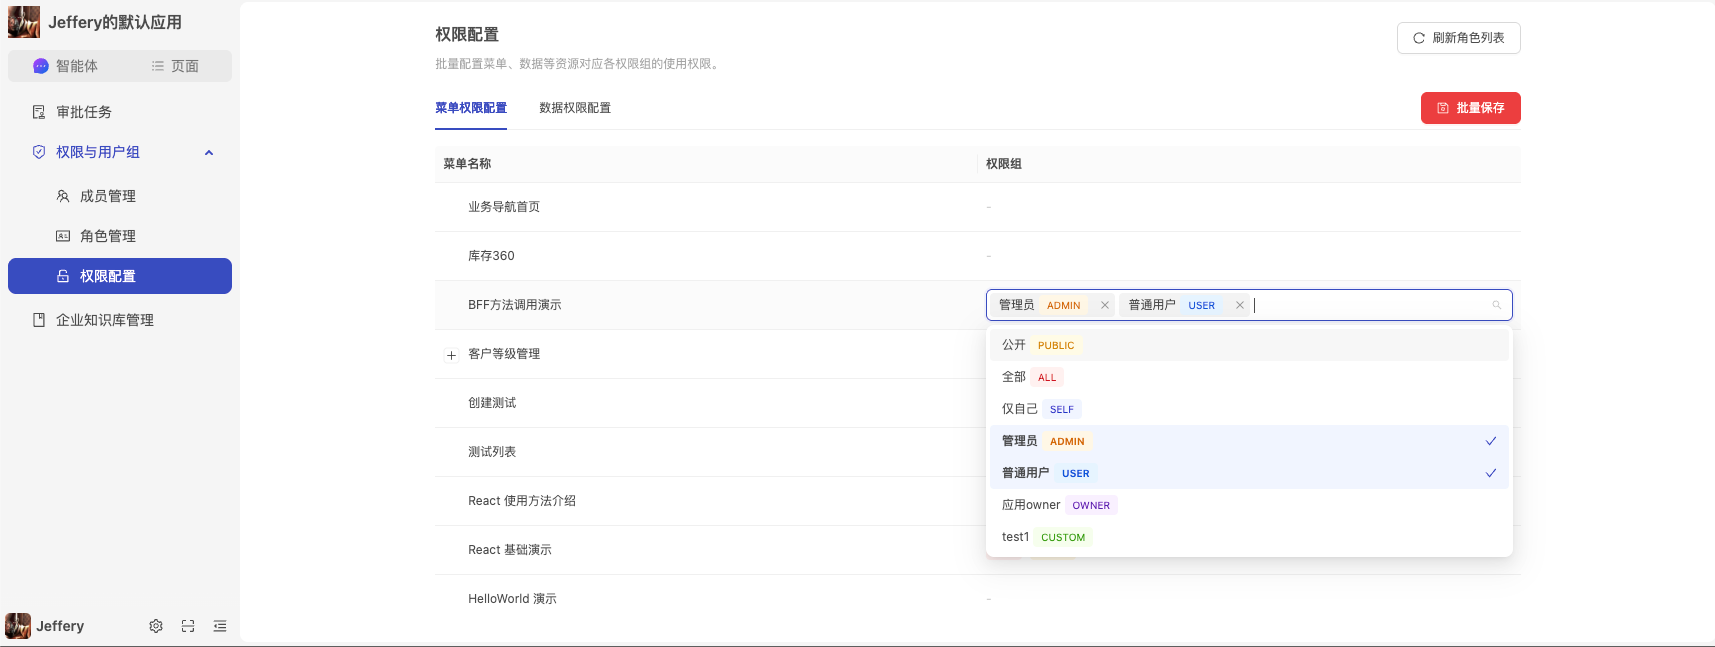
Menu permission config
A tree table lists all menu nodes (folders / pages), fully expanded by default. Columns:
- Menu name: the menu hierarchy as a tree.
- Permission groups: each cell shows the role tags currently granted on that menu. Hovering reveals an edit icon; clicking the cell switches it to multi-select editing. Blurring saves the selection locally (click "Bulk save" at the top to commit it to the backend).
Data permission config
A table with dynamic columns:
- Rows: one dataset per row.
- Columns: operation types that actually exist on the dataset (e.g., DATA_CREATE, DATA_DELETE), generated in order of appearance.
- Cells: same as menu permissions — click and multi-select the roles allowed to perform that operation.
Configuring development-mode permissions
Go to https://app.lovrabet.com, then App management -> Permissions -> Members.
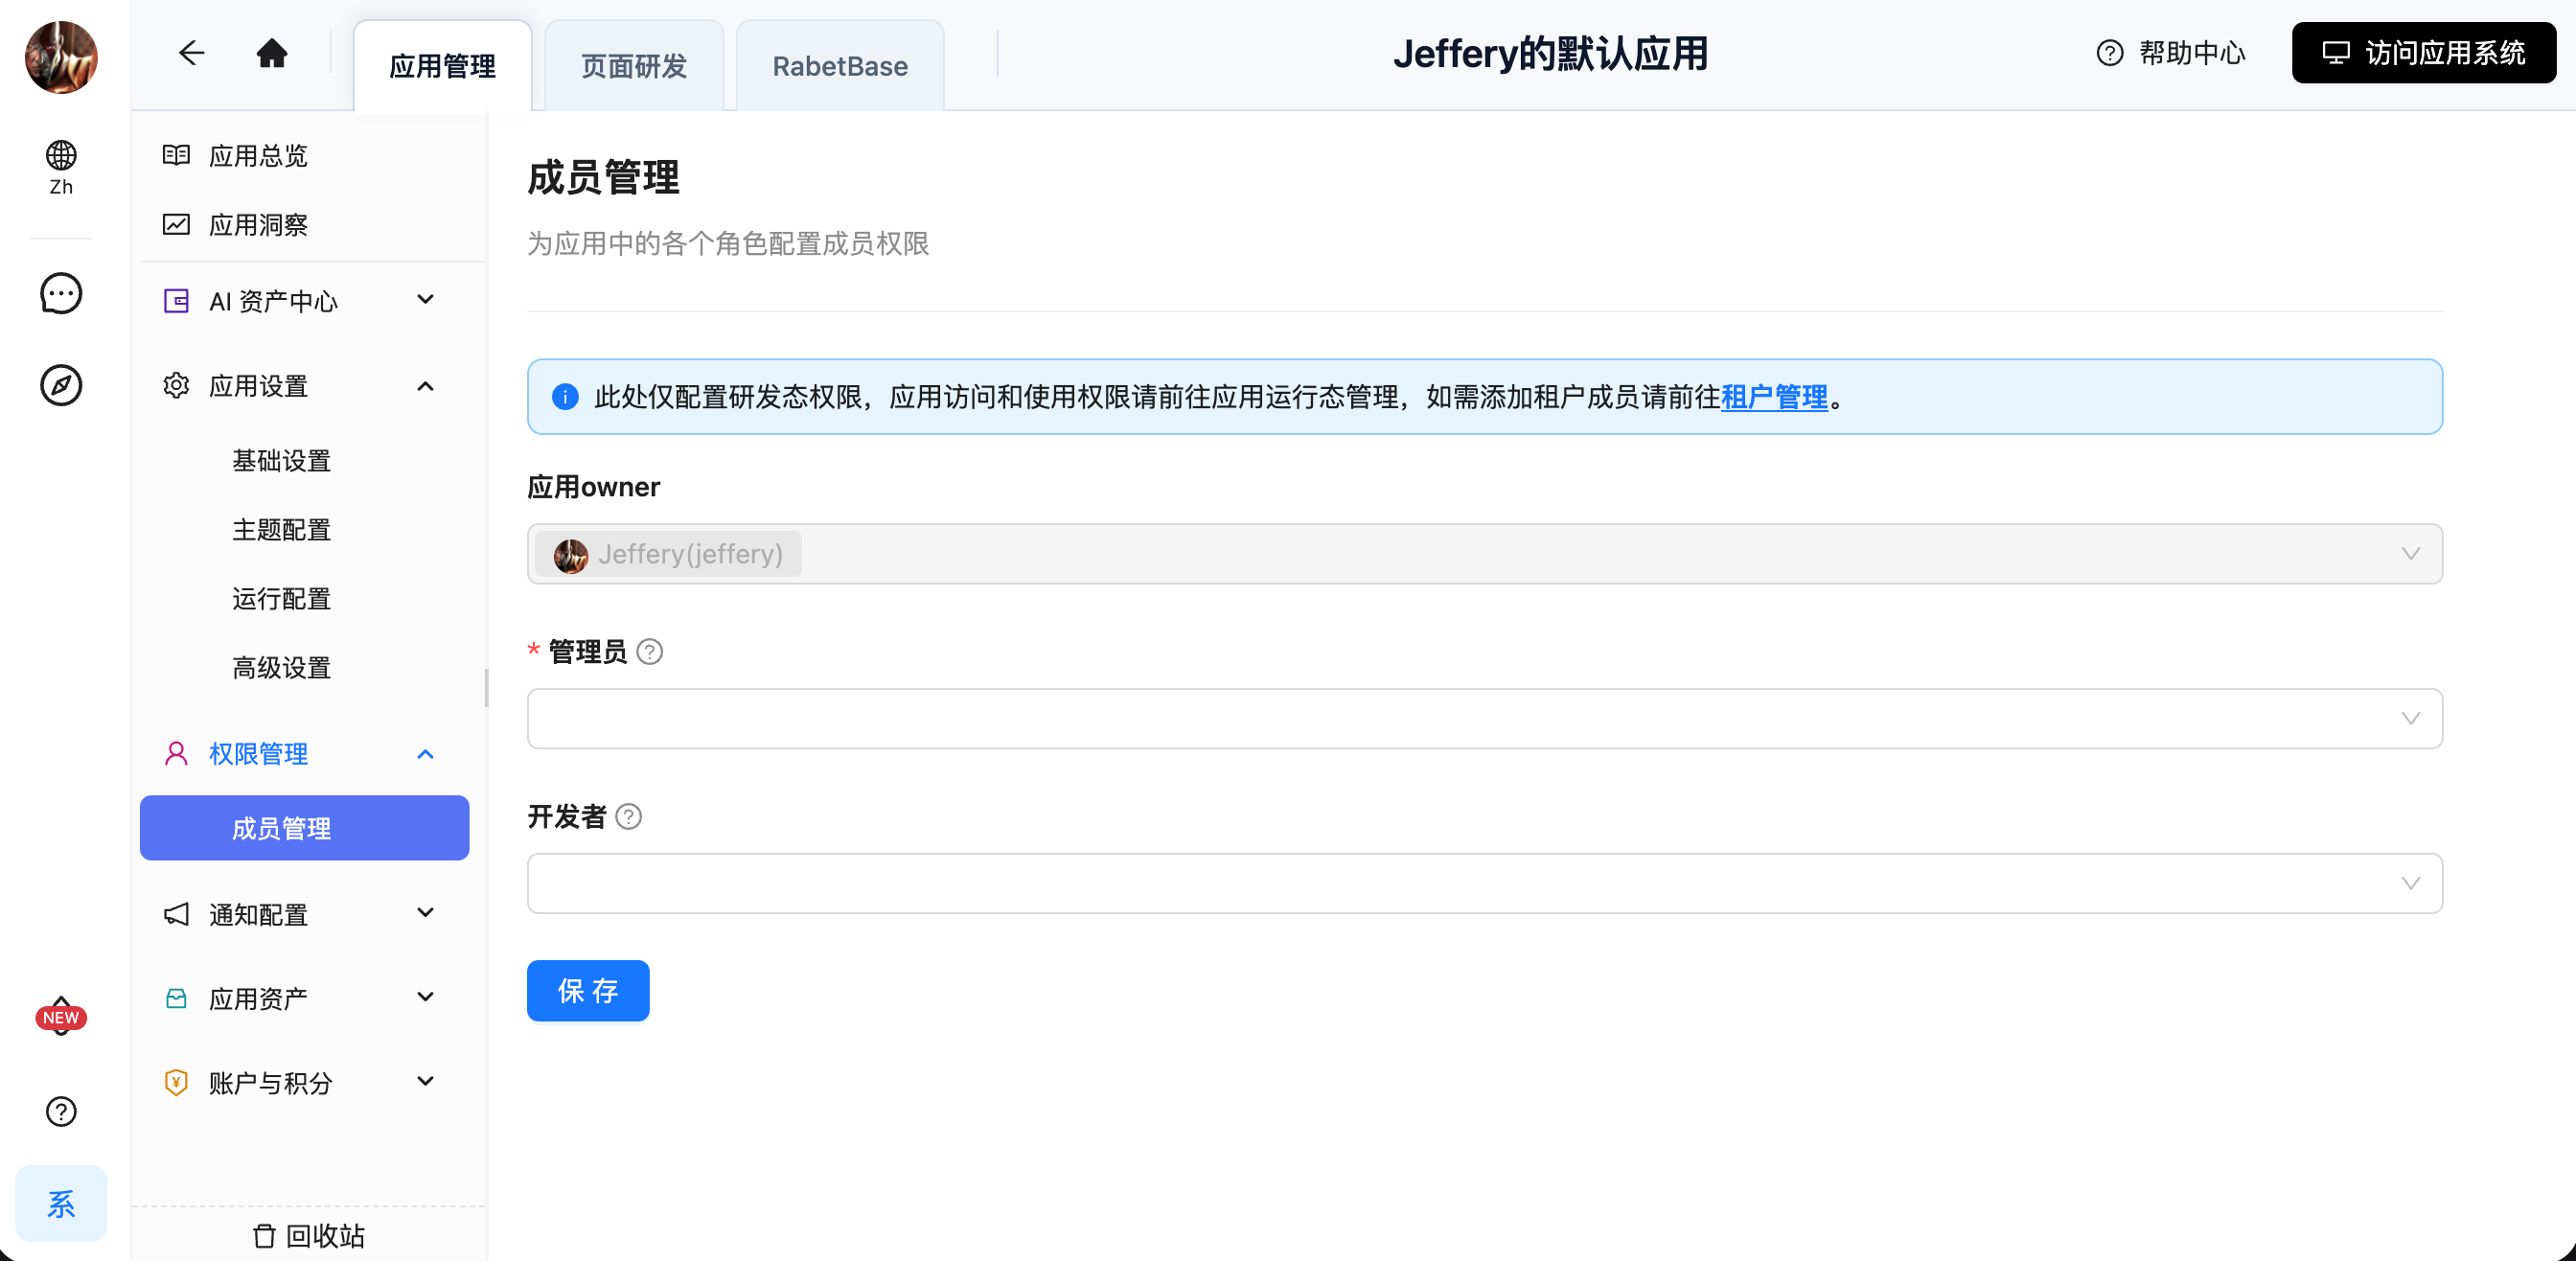
- The app owner is the app's creator and holds all permissions.
- Admins can be added; an admin holds all permissions for app development.
- Developers can be added; a developer holds development permissions for page development and RabetBase.
If the user you want to add doesn't show up, they haven't joined the tenant yet — see <cite doc-id="UmsdweZ2LisyRxk50FKcesU6n5c" file-type="wiki" title="添加开发者:邀请同事加入企业租户" type="doc"></cite>
Notes
- OWNER is special: OWNER group members always hold full permissions. In member management, they cannot have their role changed or be removed, and OWNER never appears as a target in the bulk role-change dropdown.
- When role changes take effect: permission config applies immediately on submit — no separate publish step.
- Runtime vs. development-mode permissions: runtime permissions are managed entirely in the app runtime (as described on this page) and control access to app resources such as menus and data. Development-mode permissions are granted in the app development environment, distinguish only admins and developers, and control production permissions for the app itself (app name, taking the app online/offline, page development, Backend Function development, etc.).