Data list page master-detail configuration
Who this guide is for
This guide is for:
- Business operations staff who configure dataset relations manually through the UI
- Anyone modeling one-to-many relationships — such as "orders and order items", "contracts and payment plans", or "projects and tasks" — as master-detail tables
- Implementation and delivery staff who need to confirm master-detail configuration items, field meanings, and acceptance criteria
It is not for:
- Developers changing backend transaction APIs or bulk import logic
- Developers customizing master-detail layouts inside a React JSX page
- Anyone setting up plain LOOKUP relations, enum mappings, or employee pickers
In a data list page, master-detail configuration expresses the business relationship of "one master record with many detail records underneath". It tells the platform which table is the master, which is the detail table, and which field on the detail table belongs to the master — so that lists, detail views, and forms display and maintain detail data correctly.
Start with the problem
Whenever your business has "one master record with many detail records", check first whether master-detail tables apply.
For example:
- One order with many order items
- One contract with many payment plans
- One project with many project tasks
Without master-detail configuration, the usual problems are:
- The page shows only master data — never the details underneath
- Details can be maintained on their own, but there's no telling which master record they belong to
- When a data list page, detail view, or form needs to reference detail fields, the platform can't resolve the correct relation.
- AI or whoever does the configuration can only guess from field names, and page behavior stays unstable
Remember these four terms first:
Master table: the record the business opens, views, and manages — e.g. an order, contract, or projectDetail table: the records attached under a master record — e.g. order items, payment plans, project tasksRelation field: the field on the detail table that stores the master record's identifier, often called a foreign keyOne-to-many: one master record can correspond to many detail records
The short answer
- Master-detail is at heart an explicit one-to-many business relationship
- The detail table must have a field that points to the master record
- When configuring, fill in the master table, detail table, relation field, and business relation type together
- After configuring, always validate with one master record and several detail records
In dataset relations, master-detail usually maps to:
cardinality:one_to_manybizRelationType:main_sub
Don't configure master-detail just because two tables have similar field names. What matters is whether the business really has "one master record owning many detail records", and whether the detail table really has a field storing the master record's identifier.
Which two tables are you configuring
Using "order + order items" as the example:
- Master table:
order - Detail table:
order_item - Master primary key field:
id - Detail relation field:
order_id - Relation type: master-detail
- Cardinality: one-to-many
You don't need to understand the underlying implementation. Just confirm two things:
- Which table is the business entry point — that's the master table
- Which field on the detail table stores the master record's identifier
If you can't find a relation field on the detail table, don't configure master-detail yet. Complete the data model first, or confirm that the two tables are only loosely related.
Check whether it applies before you change anything
Good candidates for master-detail:
- Orders and order items
- Contracts and payment plans
- Expense reports and expense line items
- Projects and project tasks
- Any other business where "one master record has many detail records underneath"
Not a fit for master-detail:
- Plain ownership such as employees and departments
- References such as orders and customers, where many orders point to the same customer
- Fixed-value mappings such as enums, statuses, and type dictionaries
- Two tables with similar field names but no real detail ownership in the business
Quick tests:
- If opening a master record naturally means viewing its set of details, it's usually master-detail
- If you just want to show a name or attribute from another table in the list, it's usually not
- If the detail table has no field storing the master record's identifier, you can't configure master-detail directly
Steps
Step 1: Open the configuration entry and locate the dataset
There are two ways into dataset configuration. Either one works — just locate the dataset whose relations you're configuring.
Path 1: from the business page
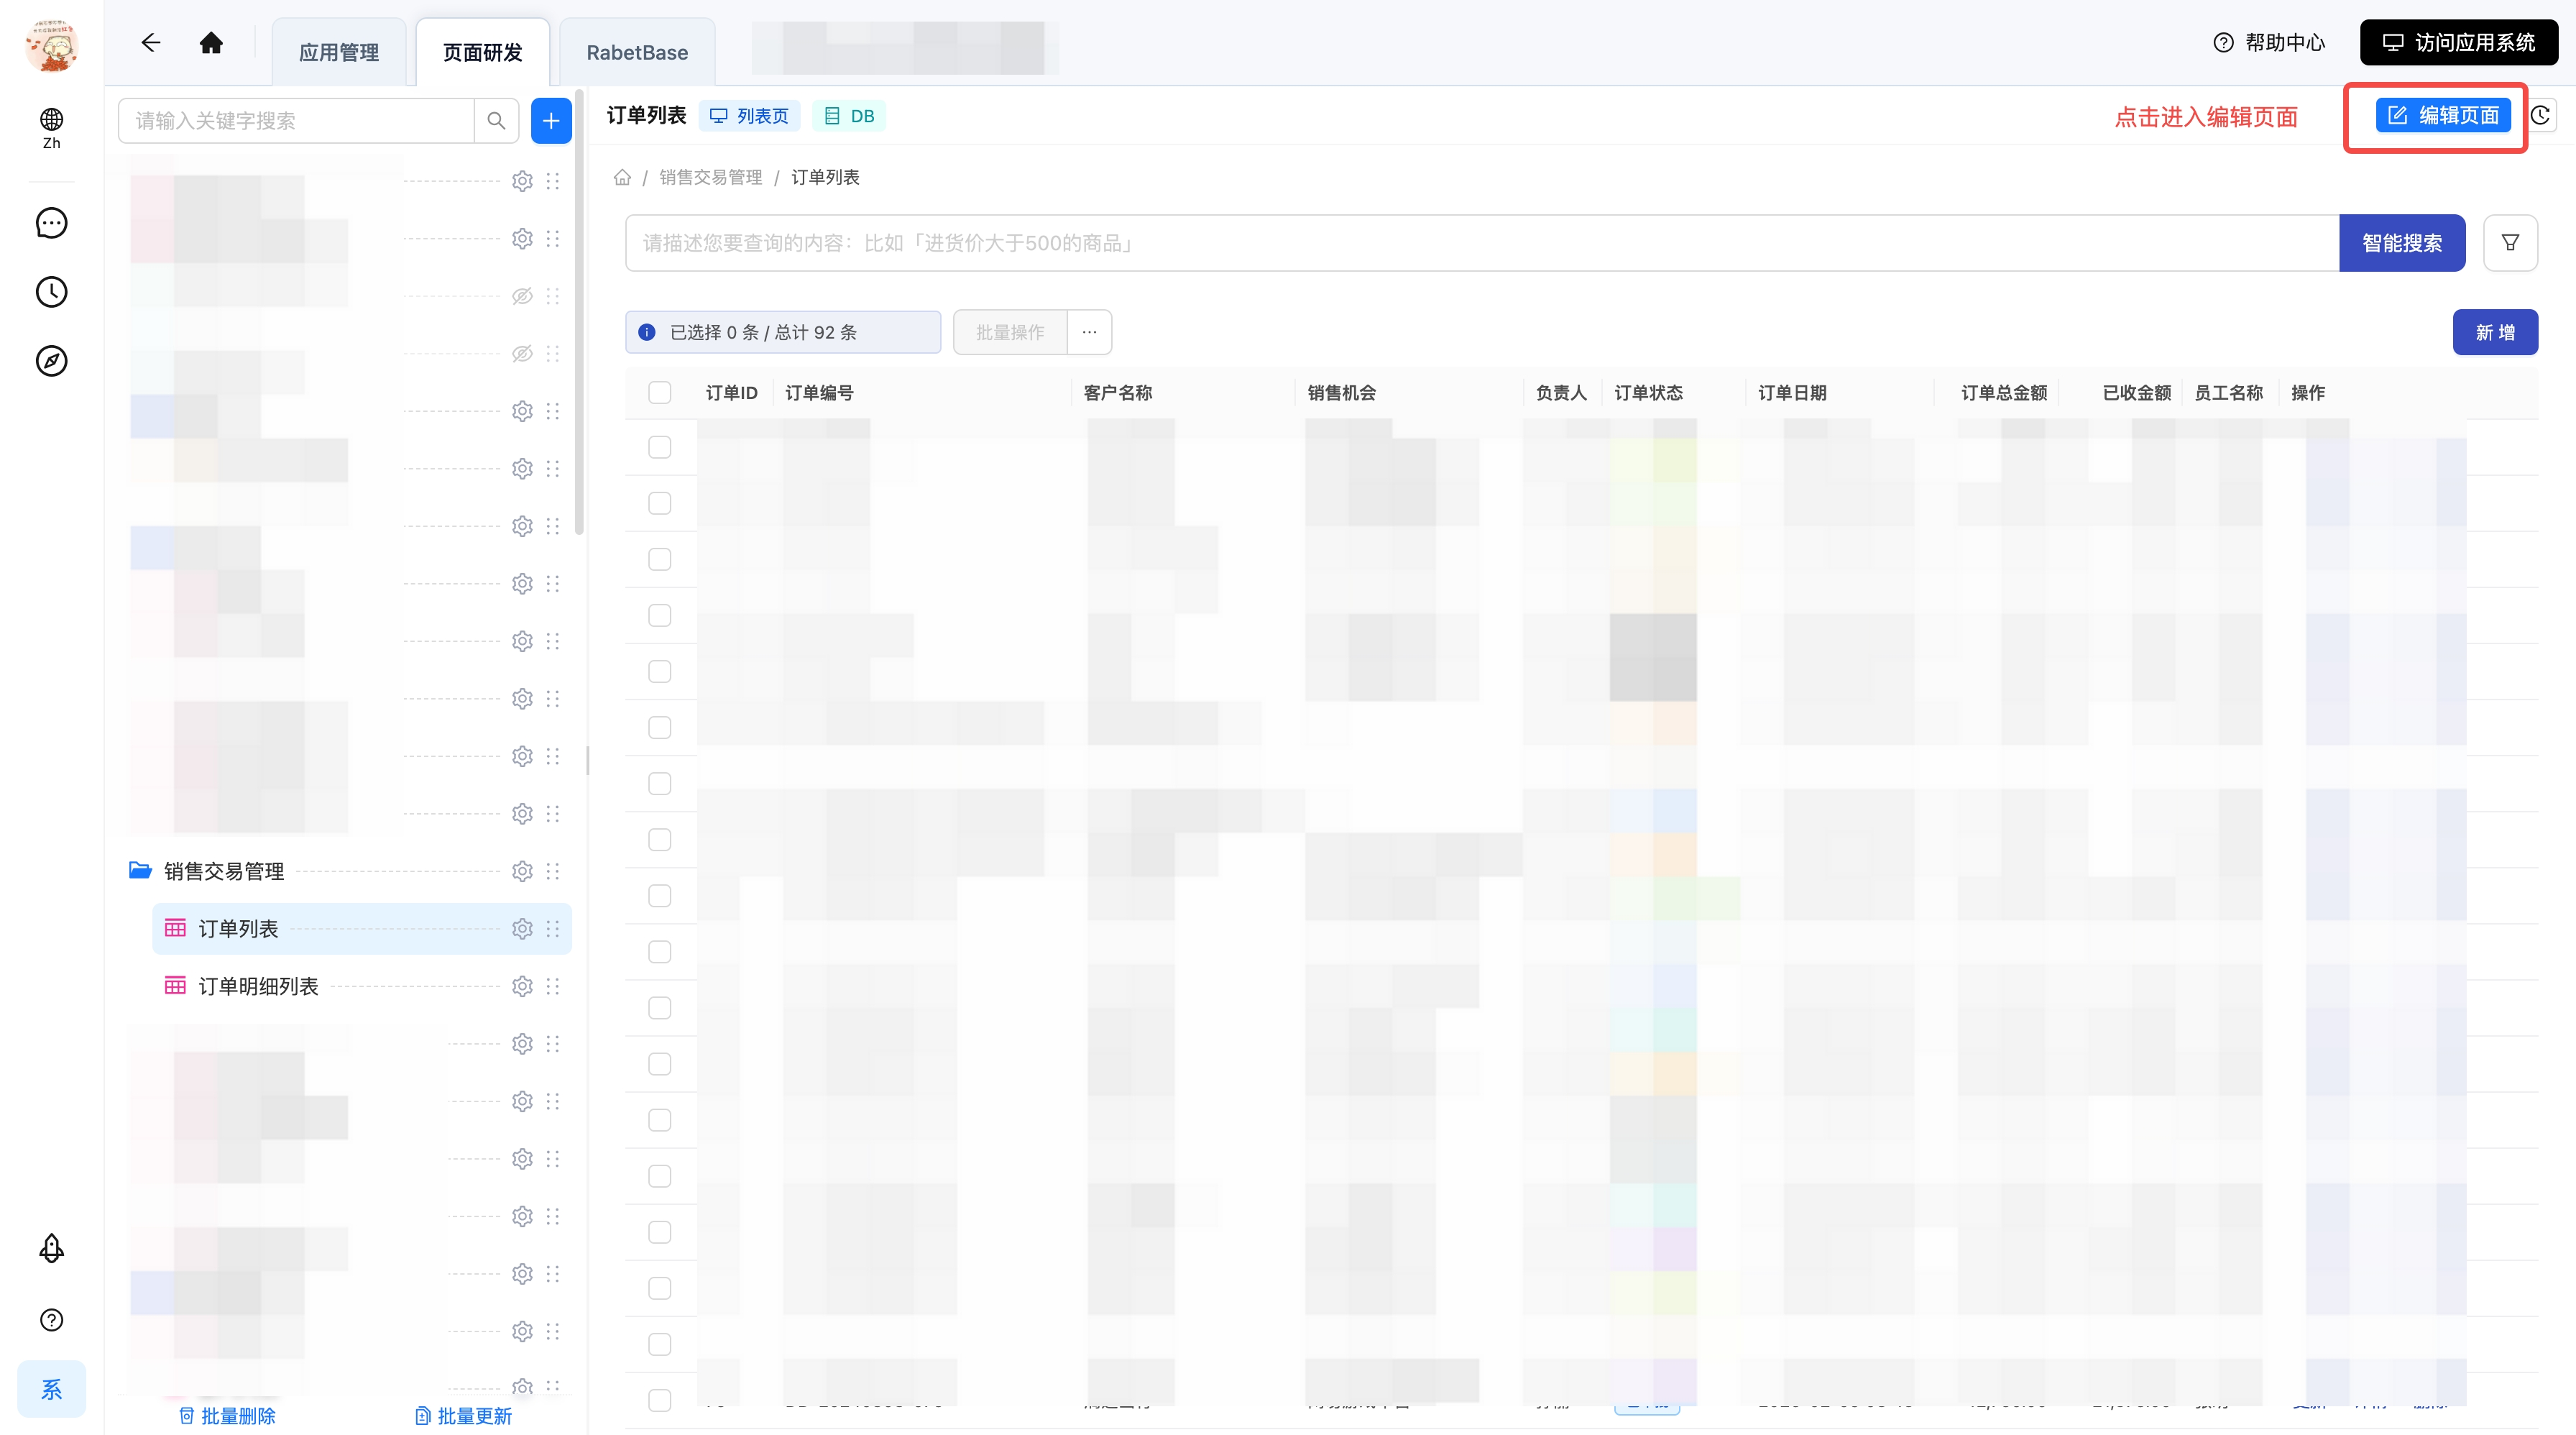
Start on the business page and open its page configuration. Usually this means clicking Edit page in the top-right corner of the business page.
Screenshot: clicking Edit page on the business page
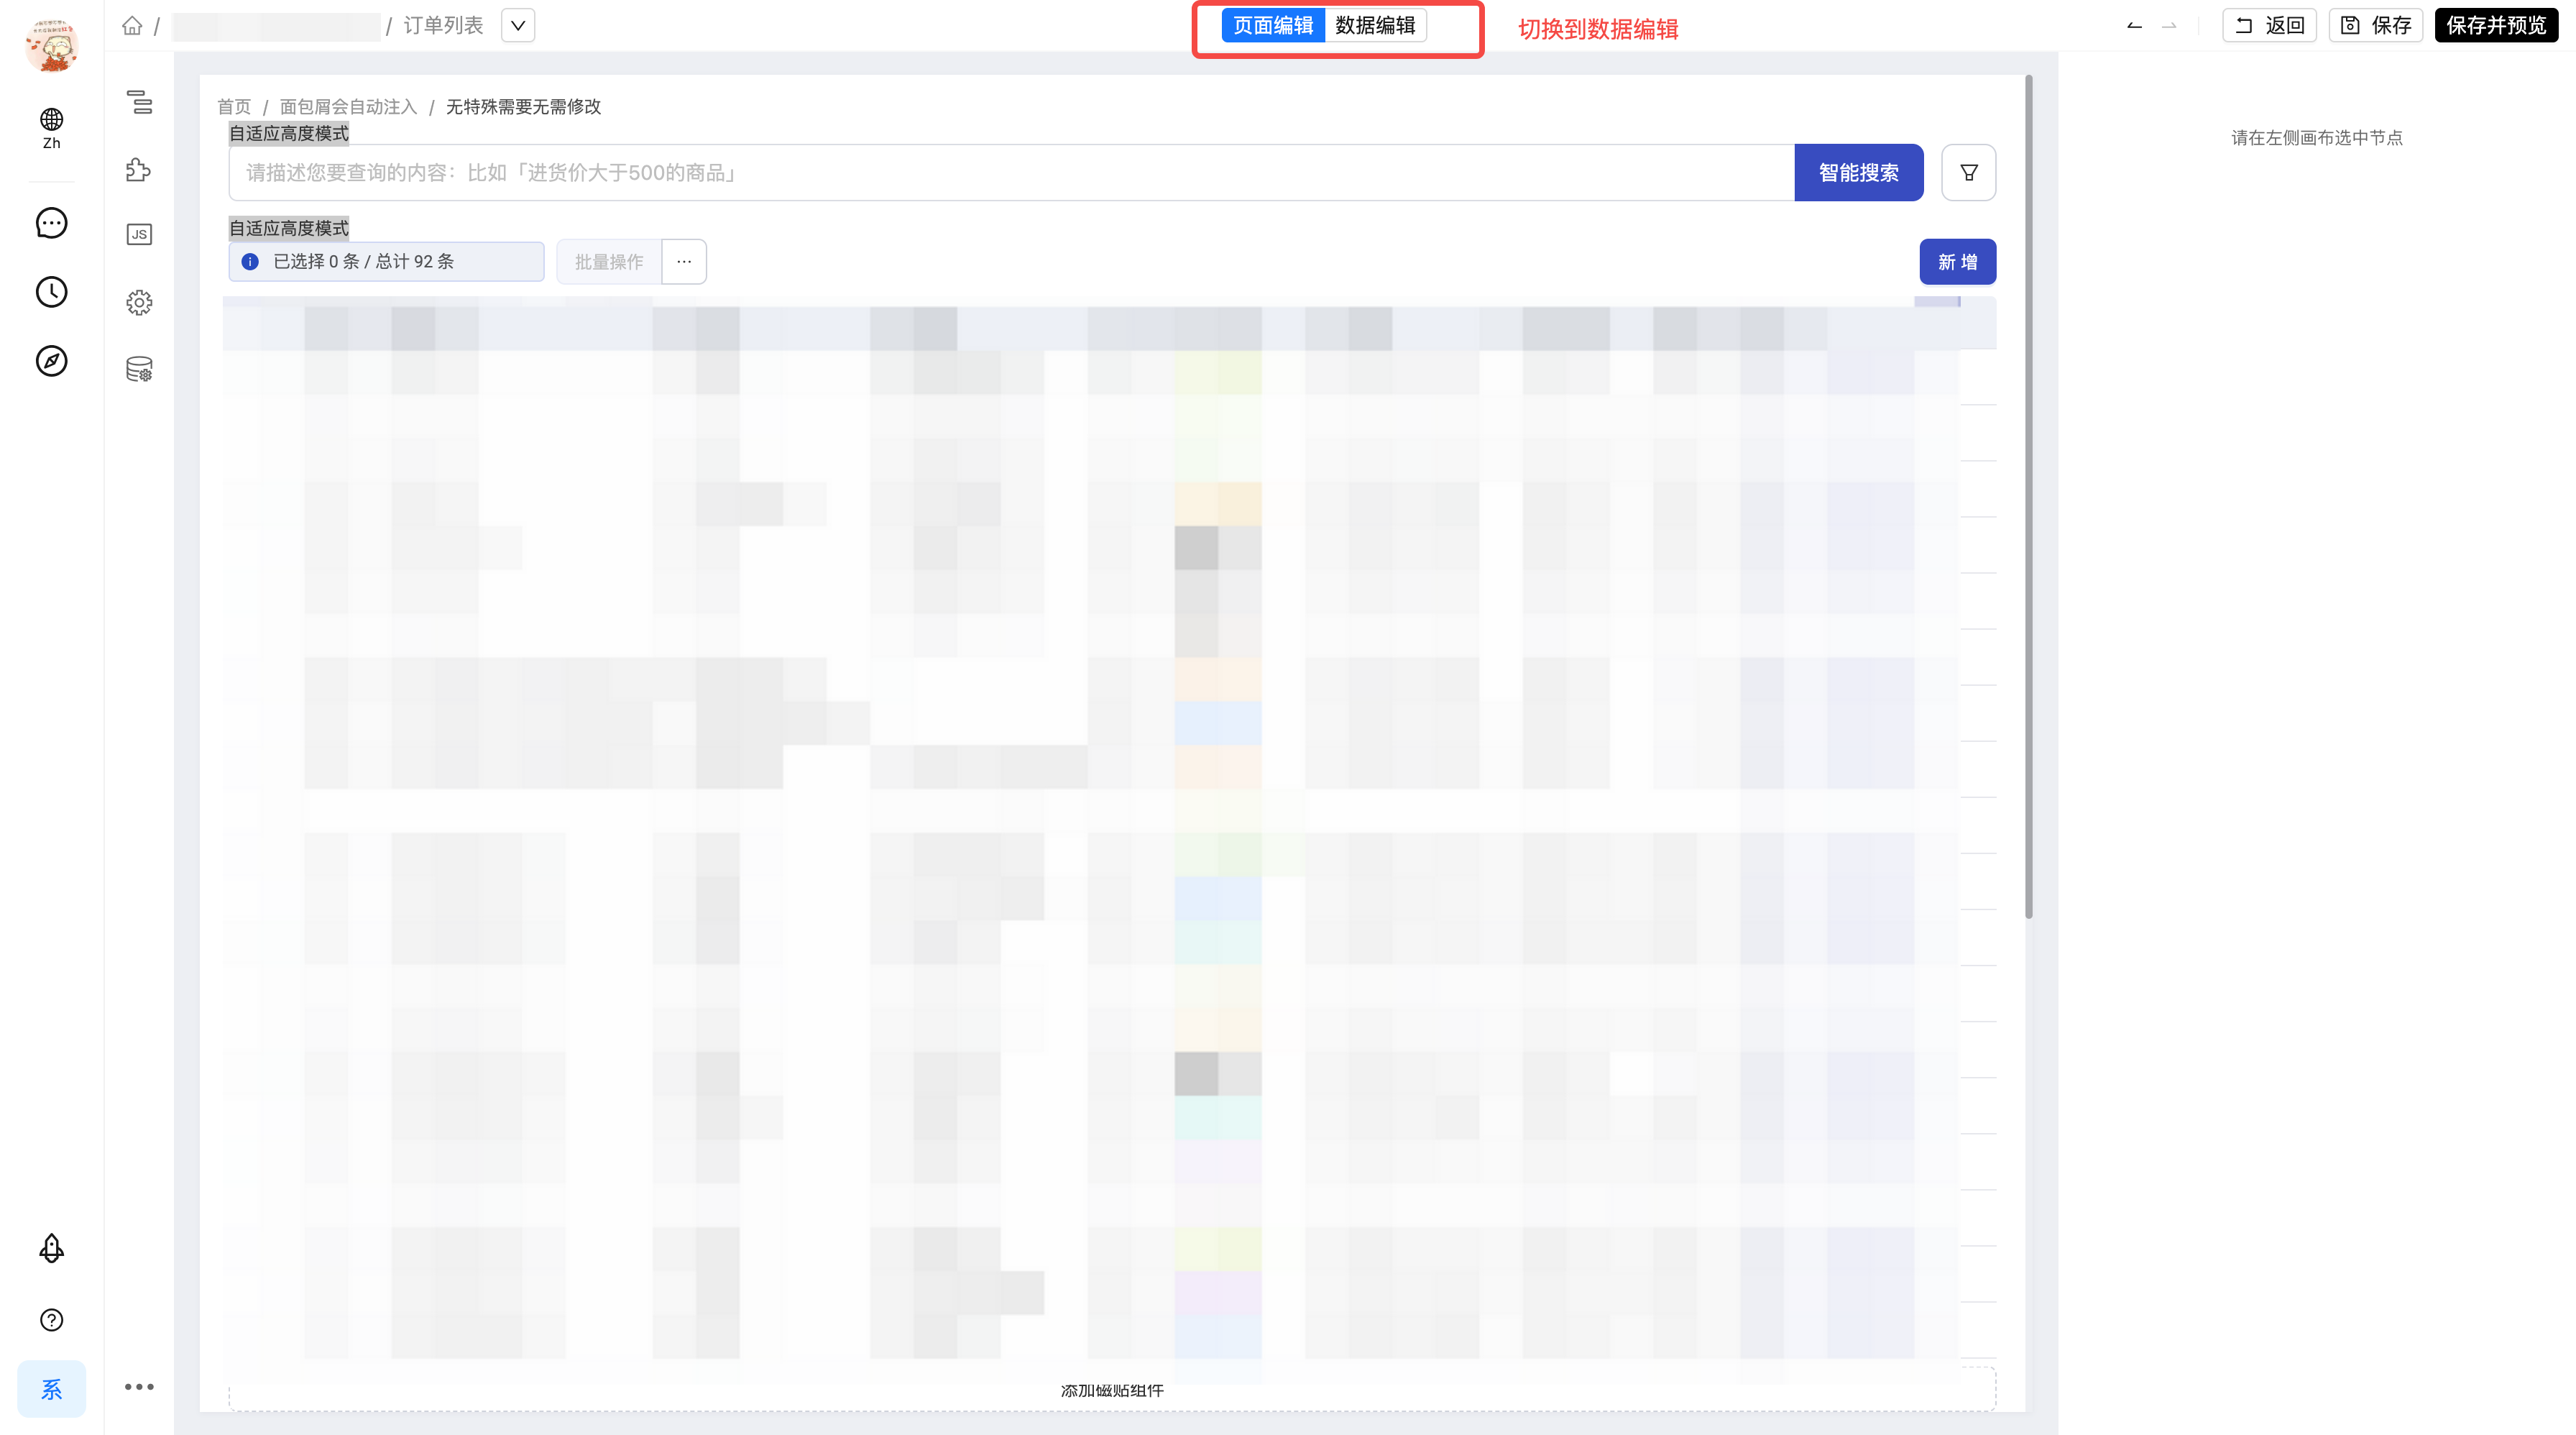
Once in page configuration, switch to Data editing.
Screenshot: switching to Data editing in page configuration
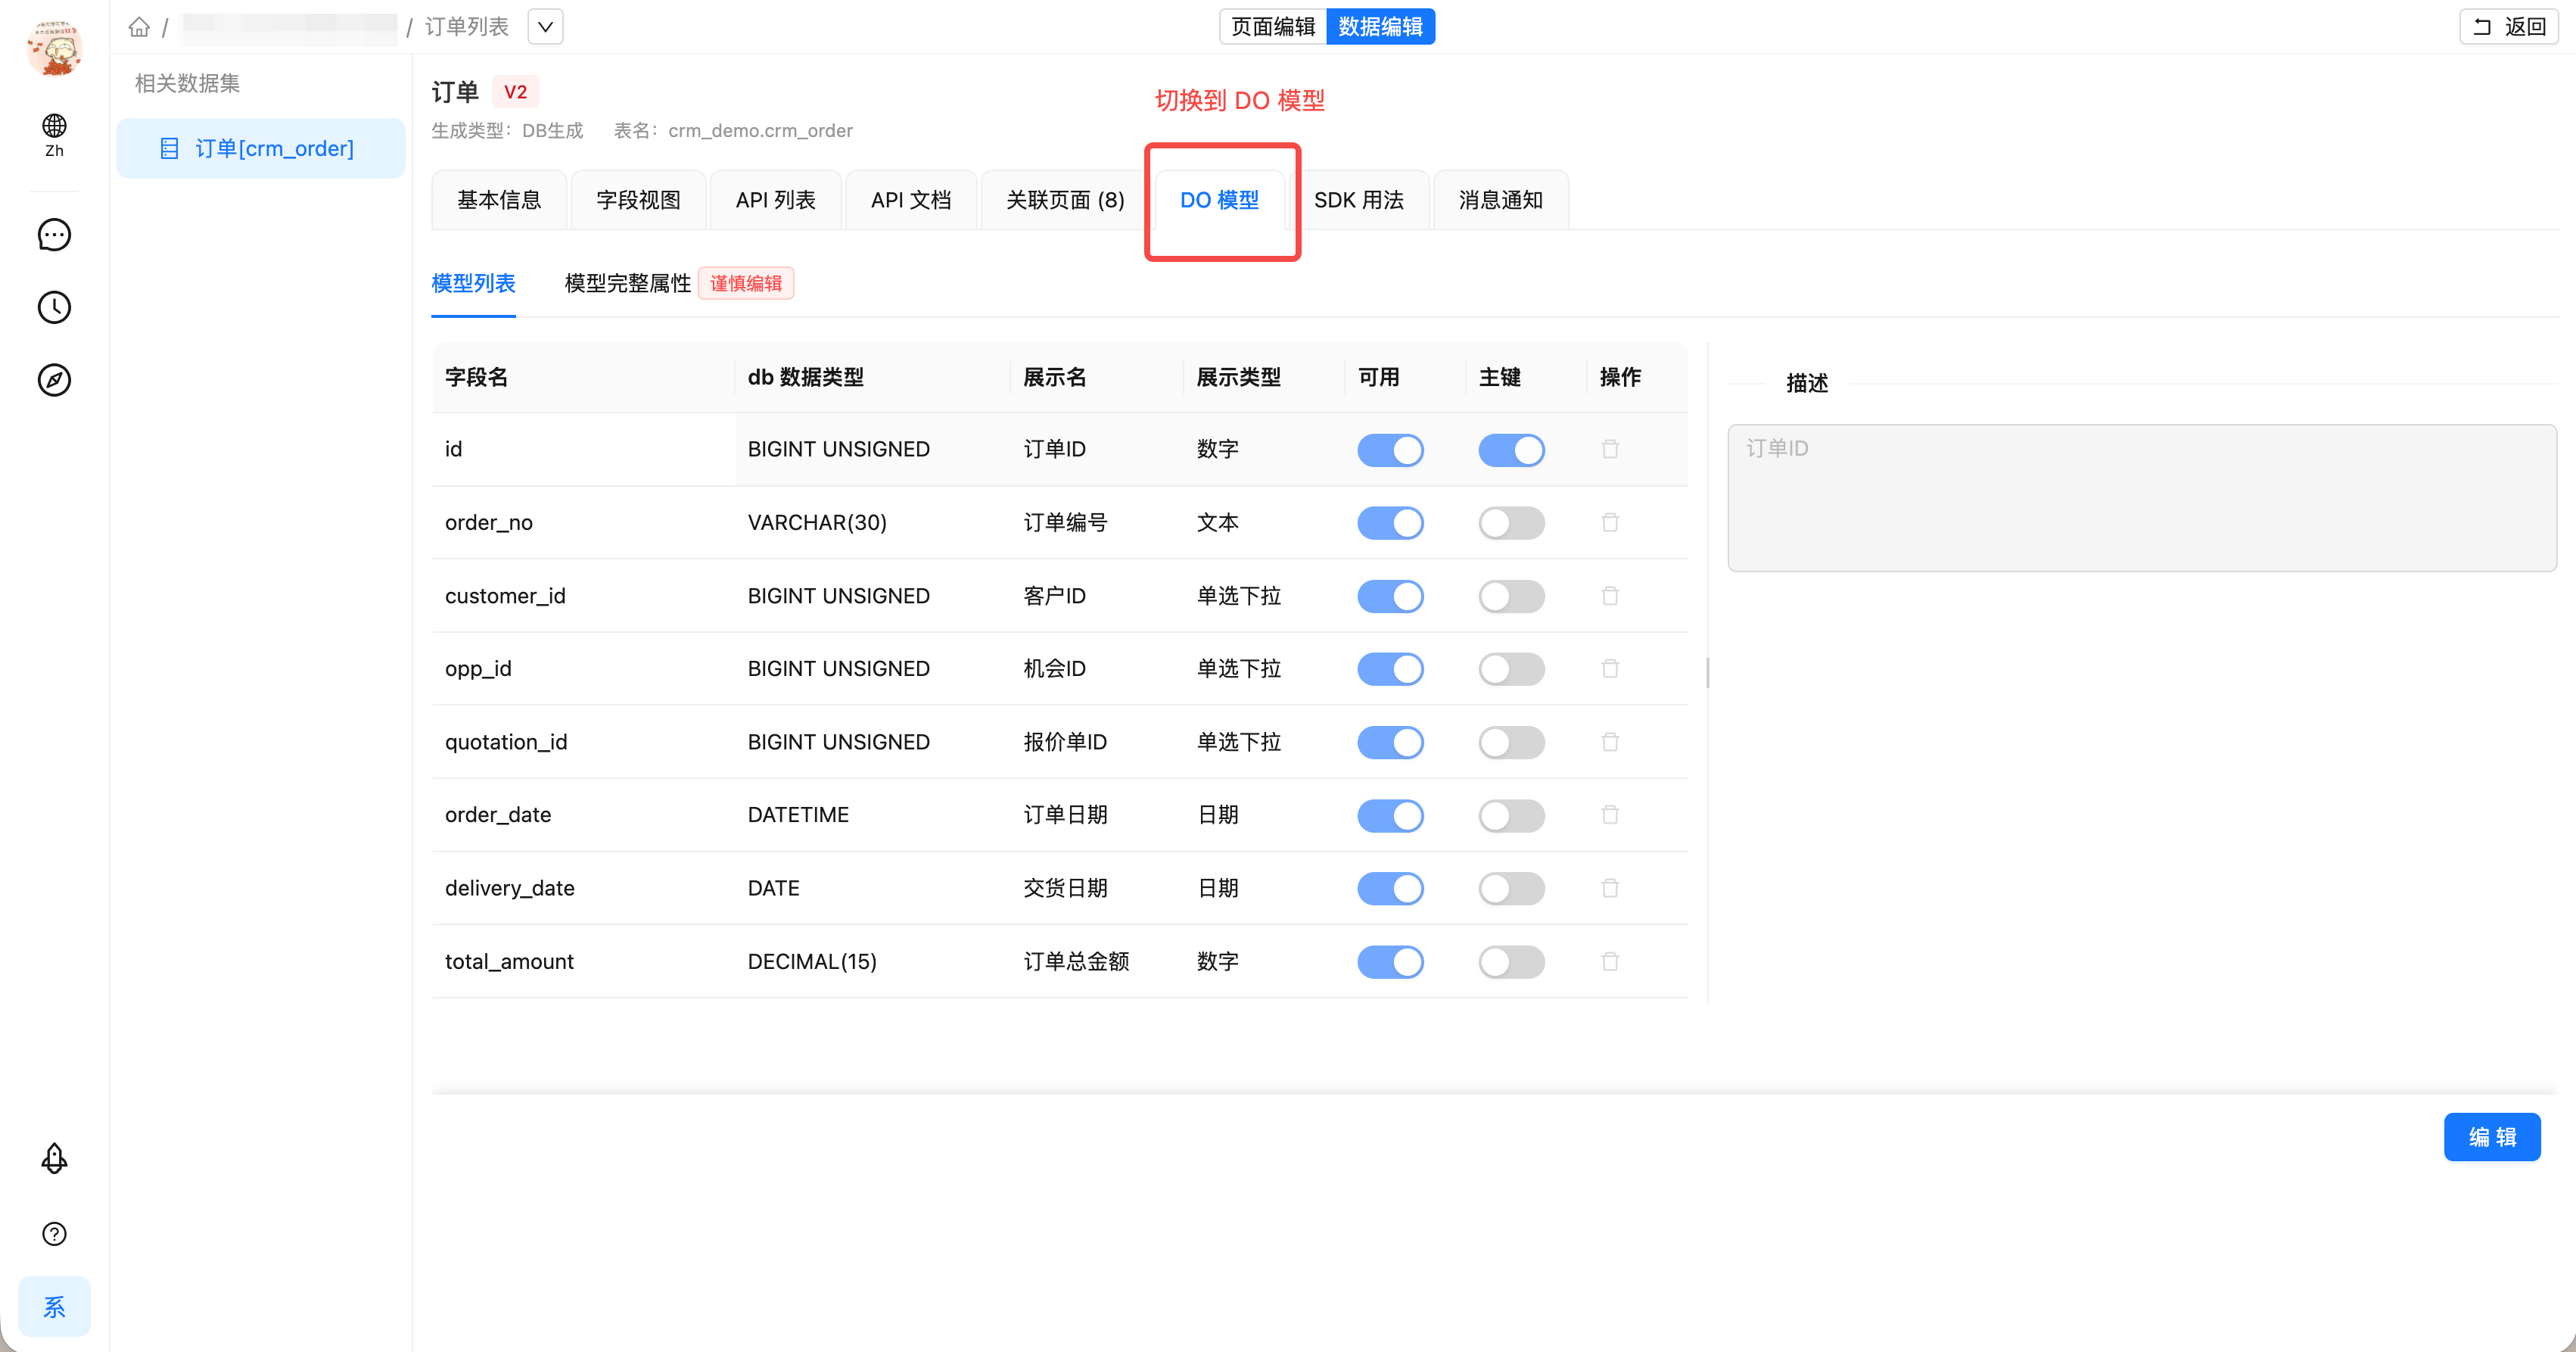
In the dataset or DO model the page uses, find the dataset relation settings.
Screenshot: opening dataset relation settings
Path 2: from the RabetBase dataset overview
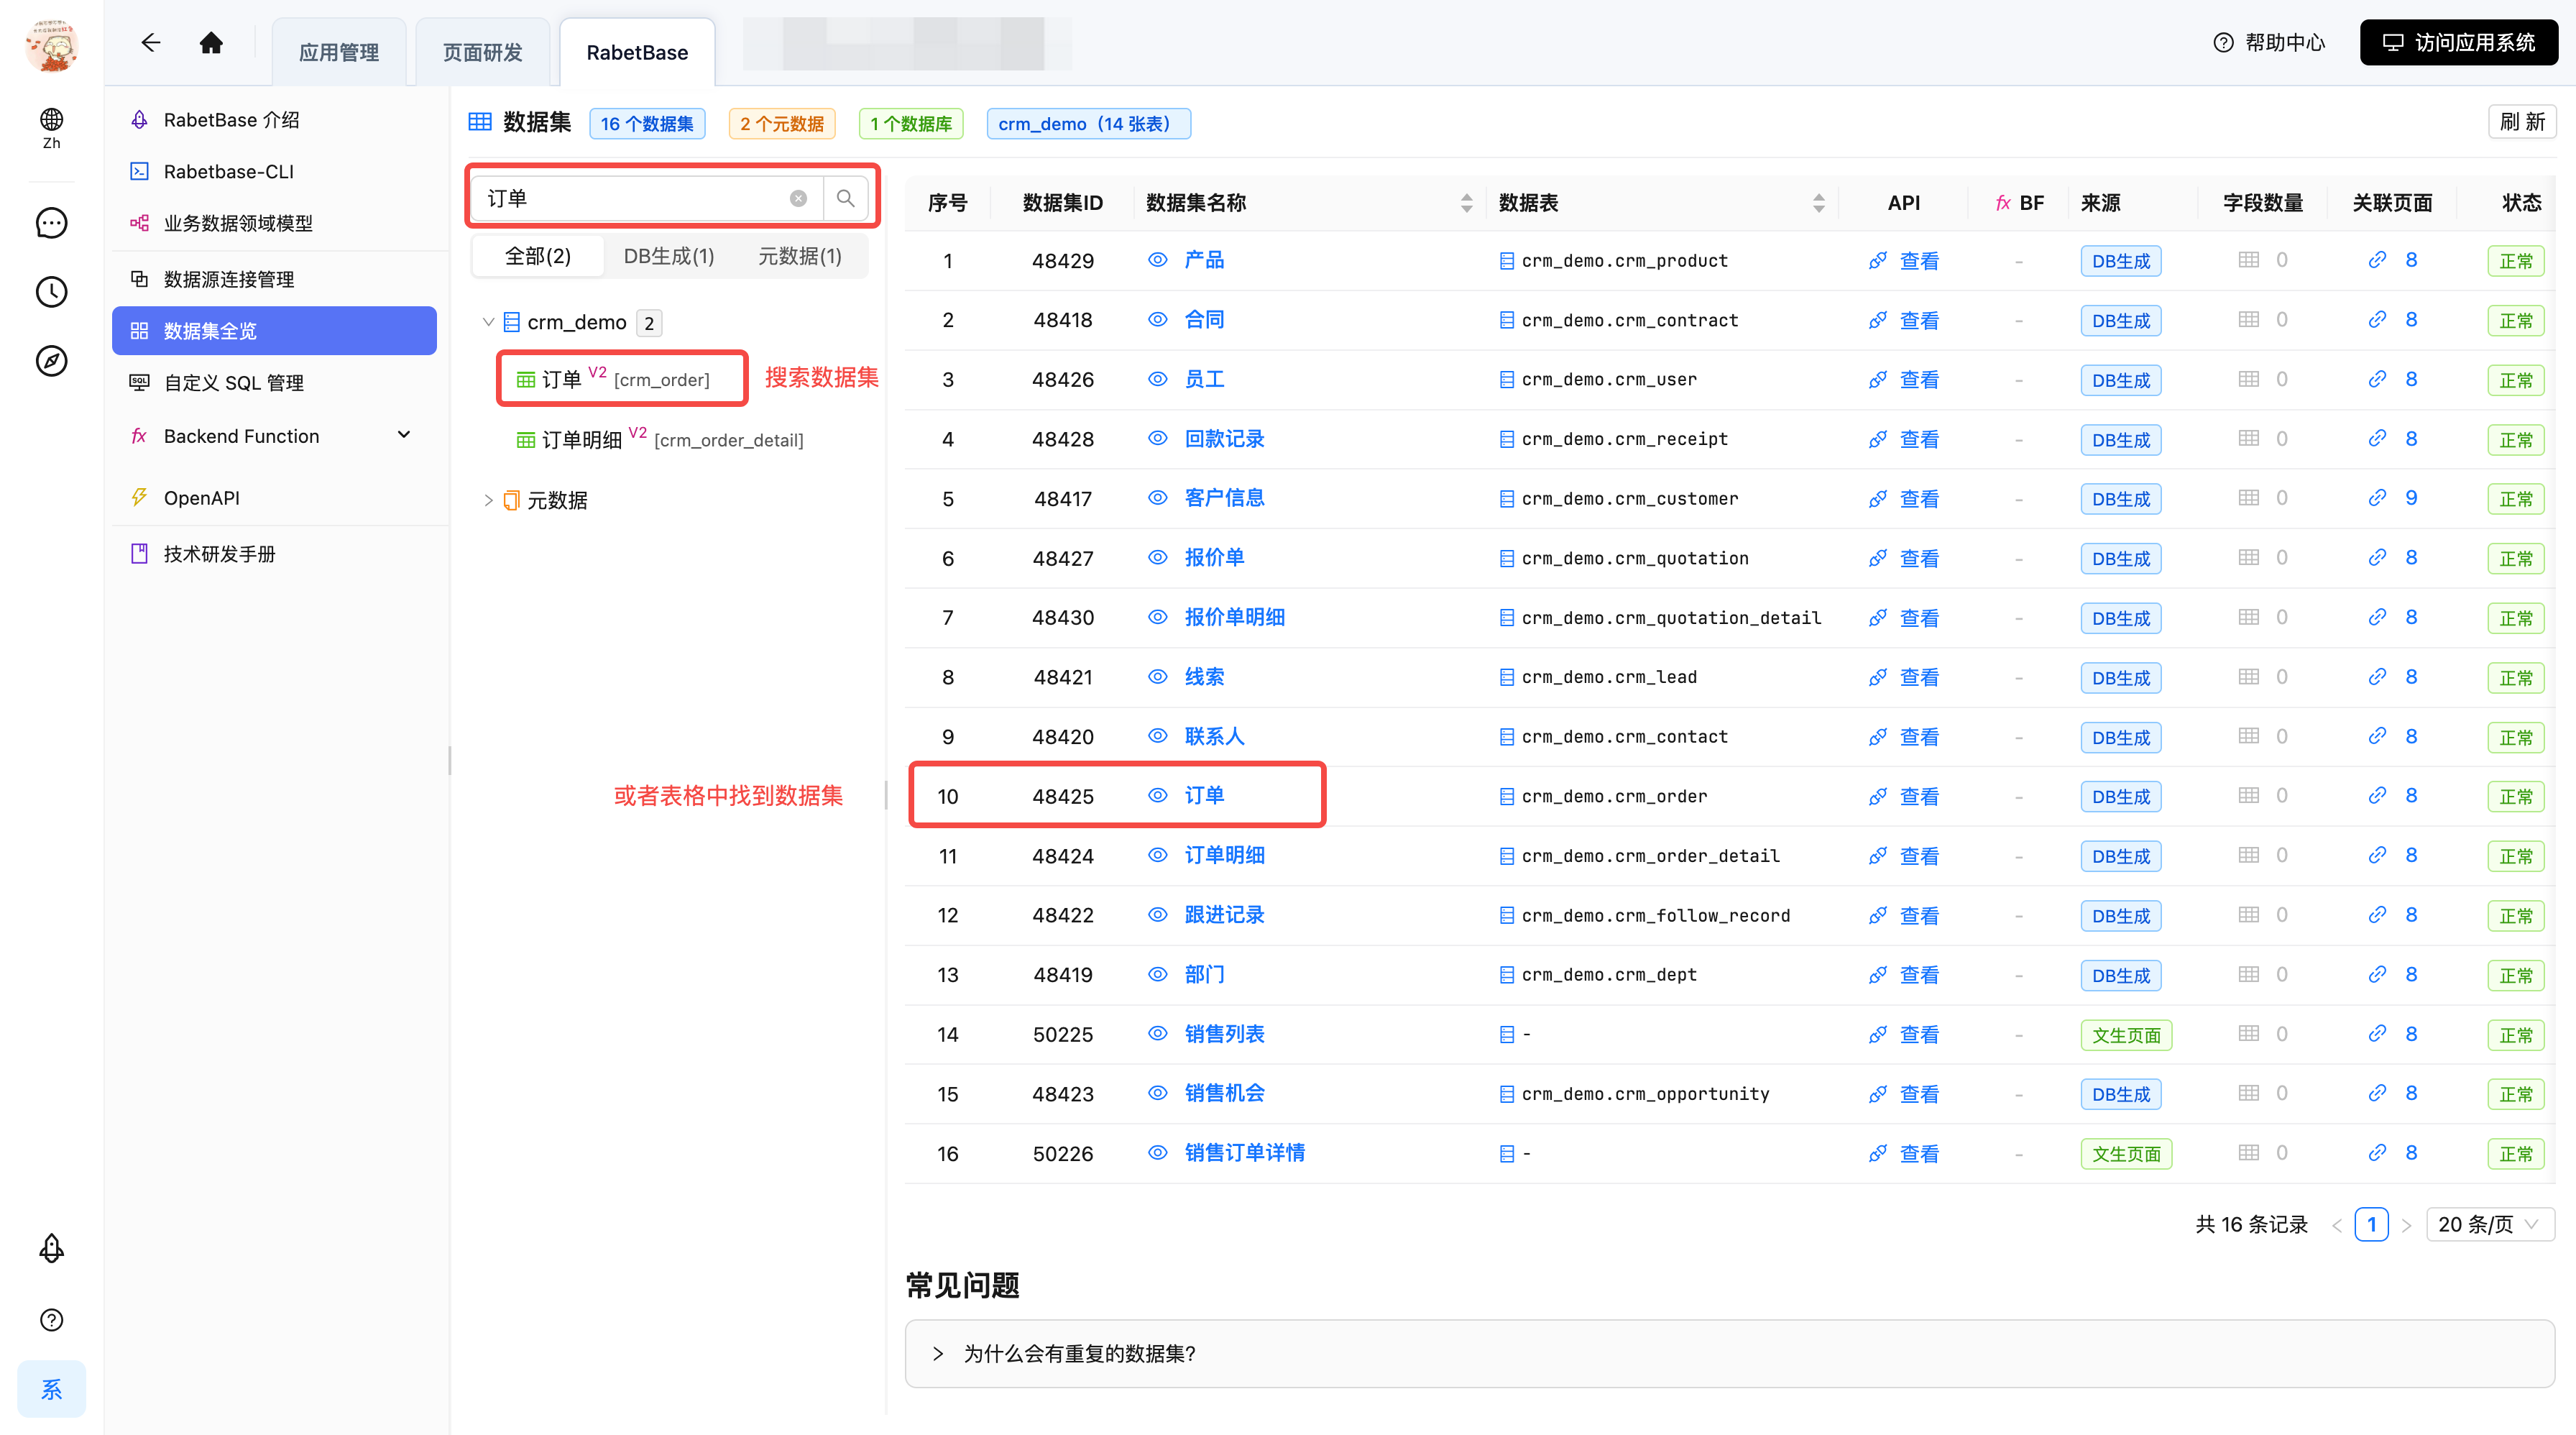
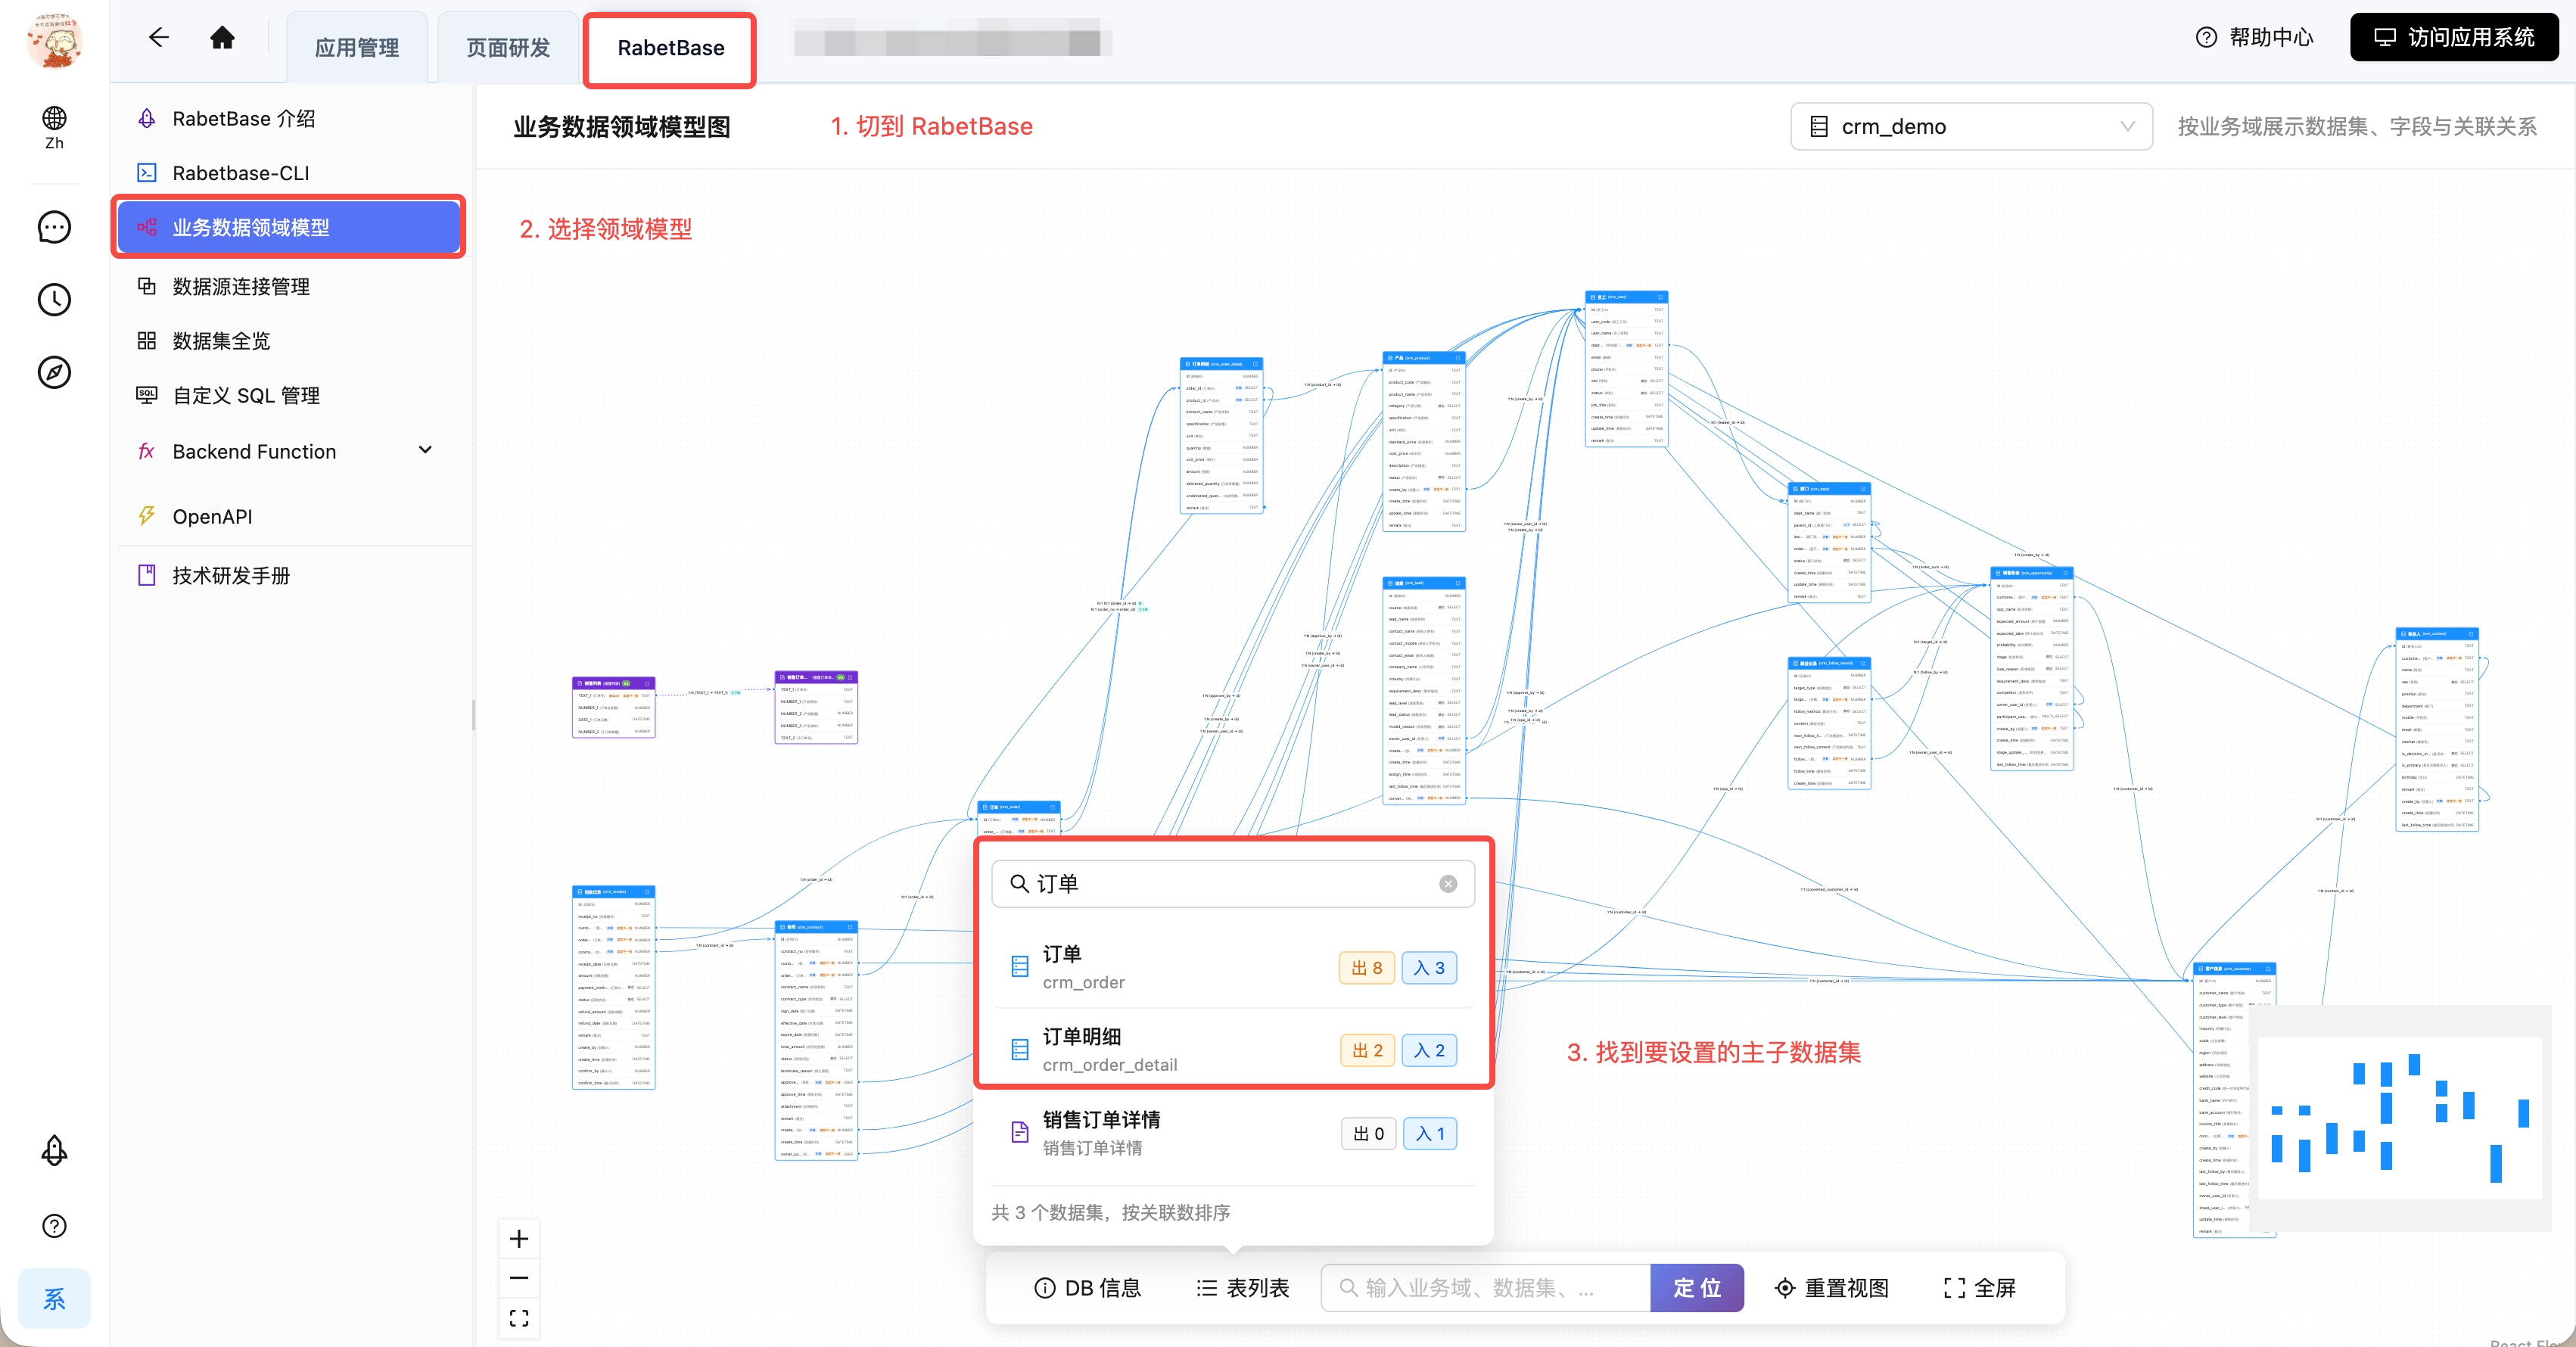
Open the RabetBase dataset overview and locate the master dataset you're configuring. Confirm it by dataset name or code, so you don't end up in a similarly named dataset that isn't part of this business page.
Screenshot: locating the master dataset in the RabetBase dataset overview
Once located, open the dataset's configuration details and continue confirming the master fields, detail fields, and dataset relations.
Step 2: Confirm the master table fields
First confirm which master table the current business page corresponds to.
For an order page, the page's dataset should be the order master table. The master table needs at least one field that uniquely identifies a record, for example:
- Field code:
id - Field name: Order ID
- Field meaning: the unique identifier of each order record
If you confirm the wrong master field, the relation may still save — but the page will easily fail to find the right details.
Step 3: Confirm the detail table fields
Next, confirm the detail table has a field pointing back to the master.
For order items, the detail table usually has:
- Field code:
order_id - Field name: Order ID
- Field meaning: which order this line item belongs to
At this step, confirm what the field actually means rather than trusting its name. order_no may be a business order number, not the master primary key; order_id is far more likely the relation field matching the master's id.
Step 4: Add the master-detail relation
In the dataset relation settings, click Add relation — or the add button in the UI — to create a blank relation entry.
Screenshot: creating a blank master-detail relation
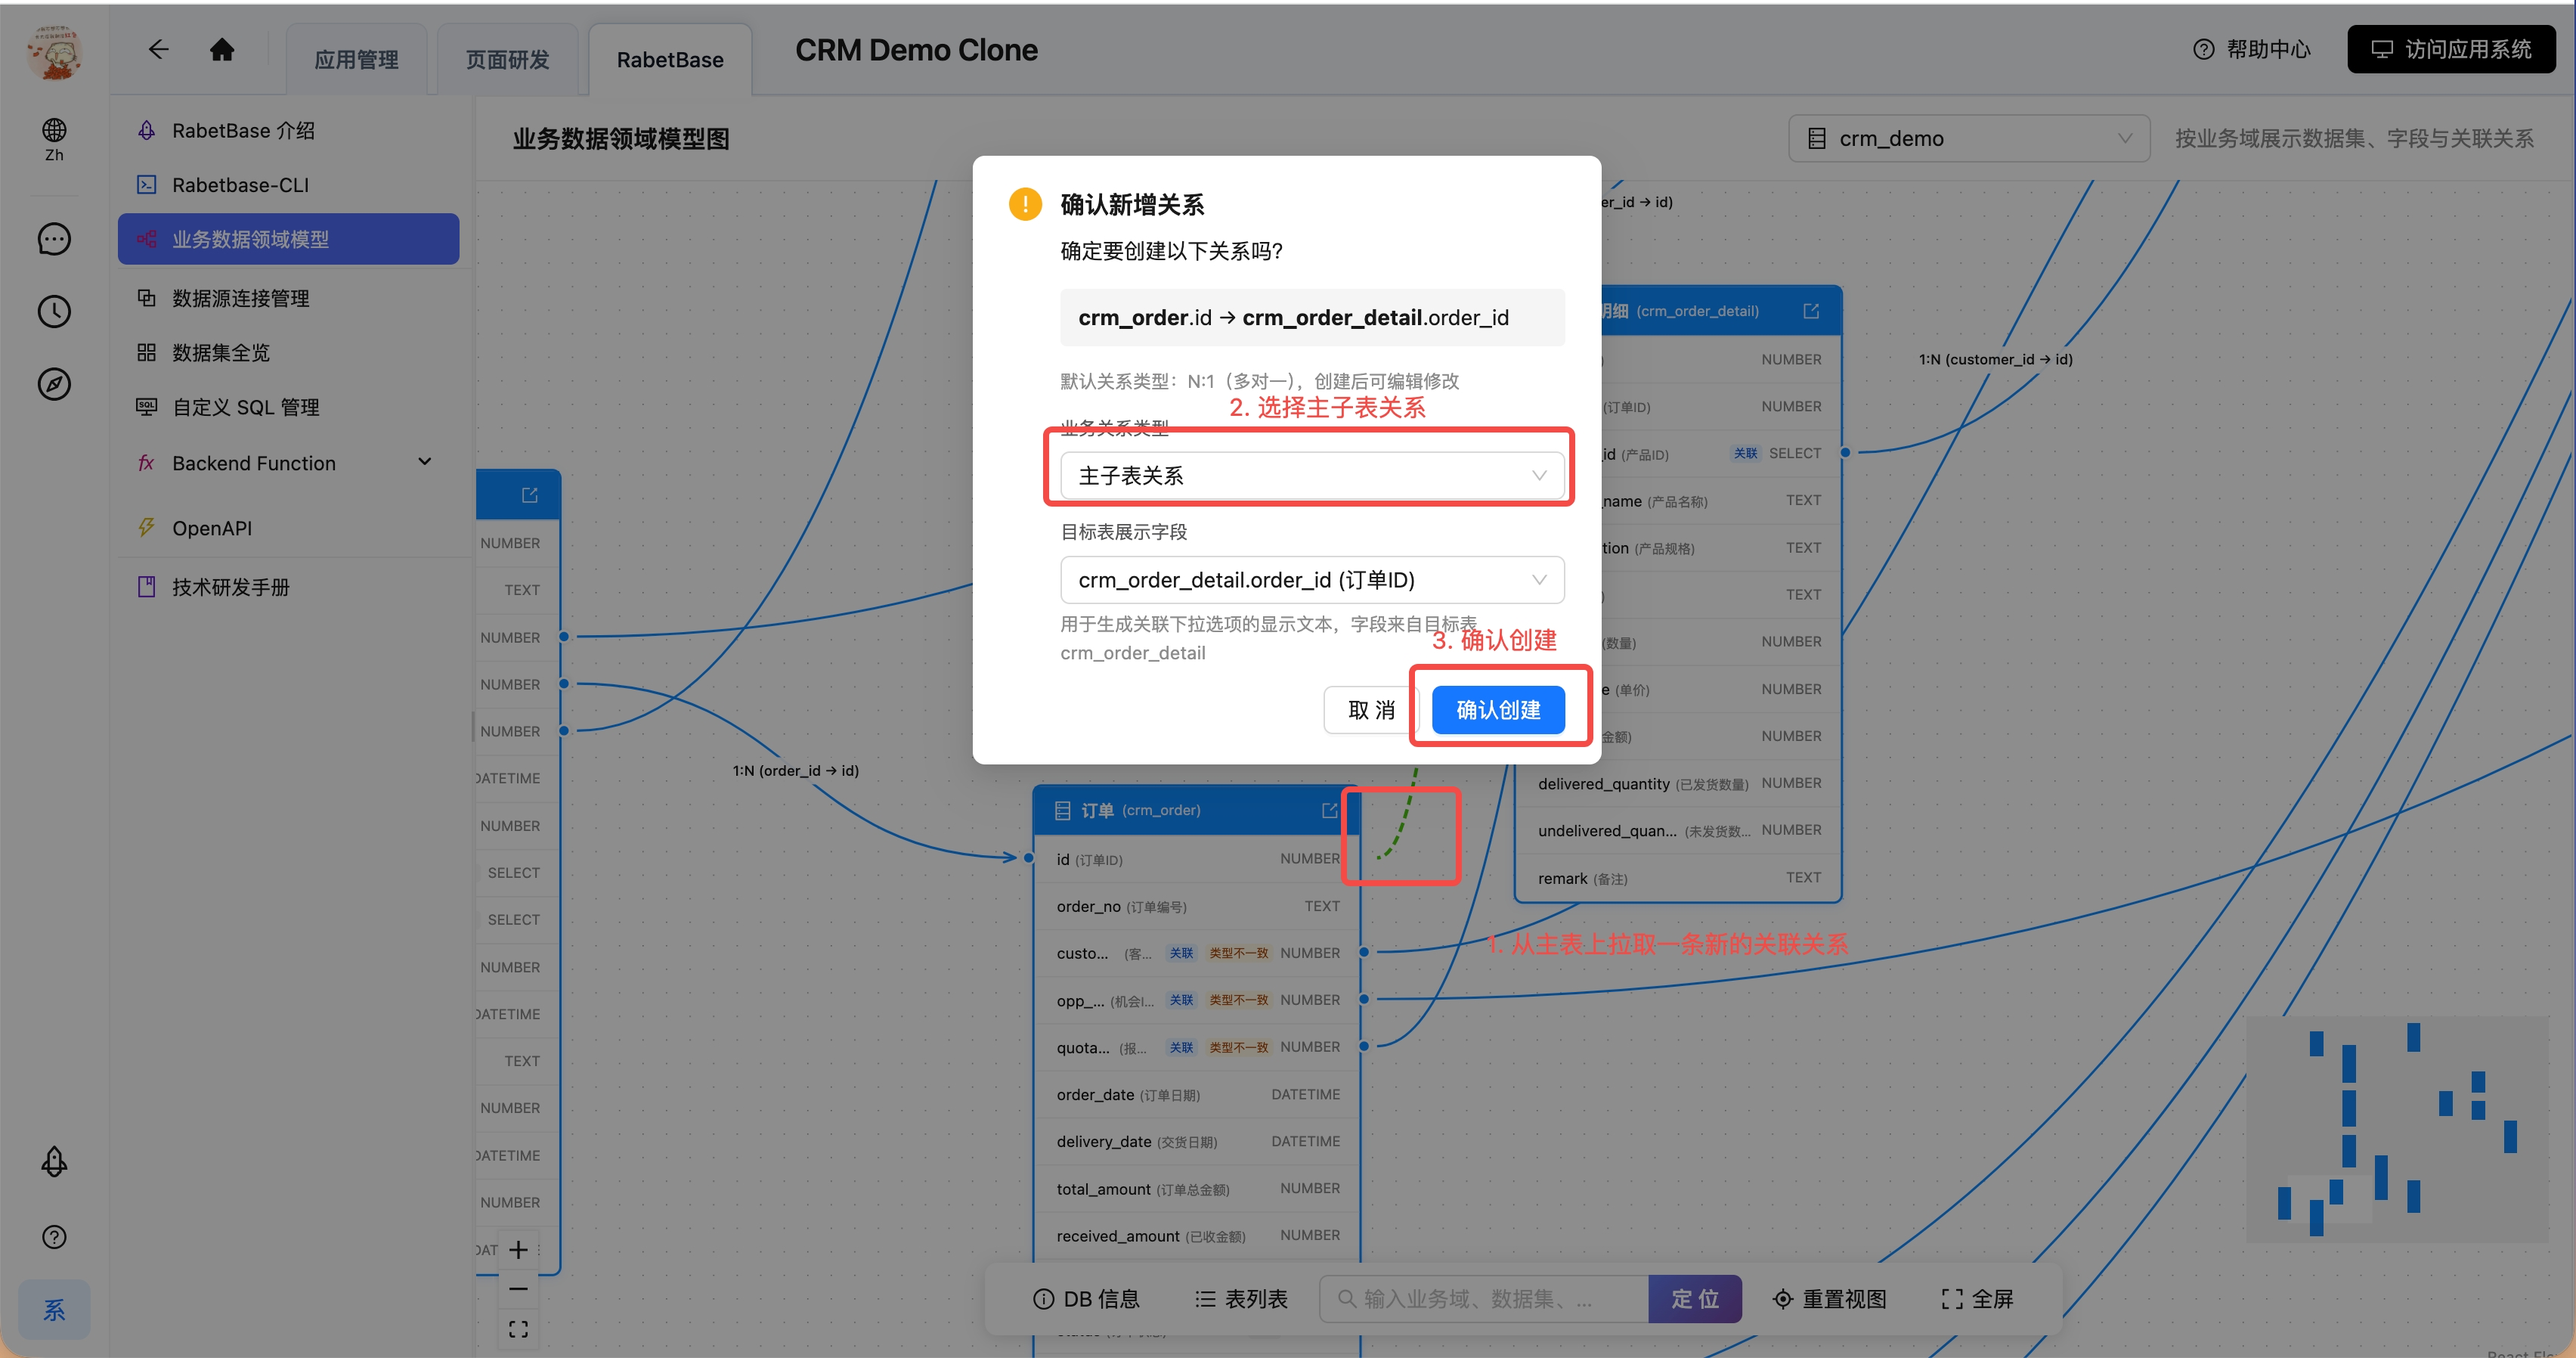
Once created, fill it in with the actual fields.
Confirm in this order:
| Setting | Example value | How to decide |
|---|---|---|
| Master dataset | order | The current business entry table |
| Master field | id | The unique identifier of master records |
| Detail dataset | order_item | The line-item table |
| Detail field | order_id | The field on the detail table storing the master identifier |
| Cardinality | one_to_many | One master record maps to many detail records |
| Business relation type | main_sub | Explicitly declares this as master-detail |
Screenshot: selecting the master table, detail table, and relation fields
Screenshot: setting the one-to-many master-detail relation
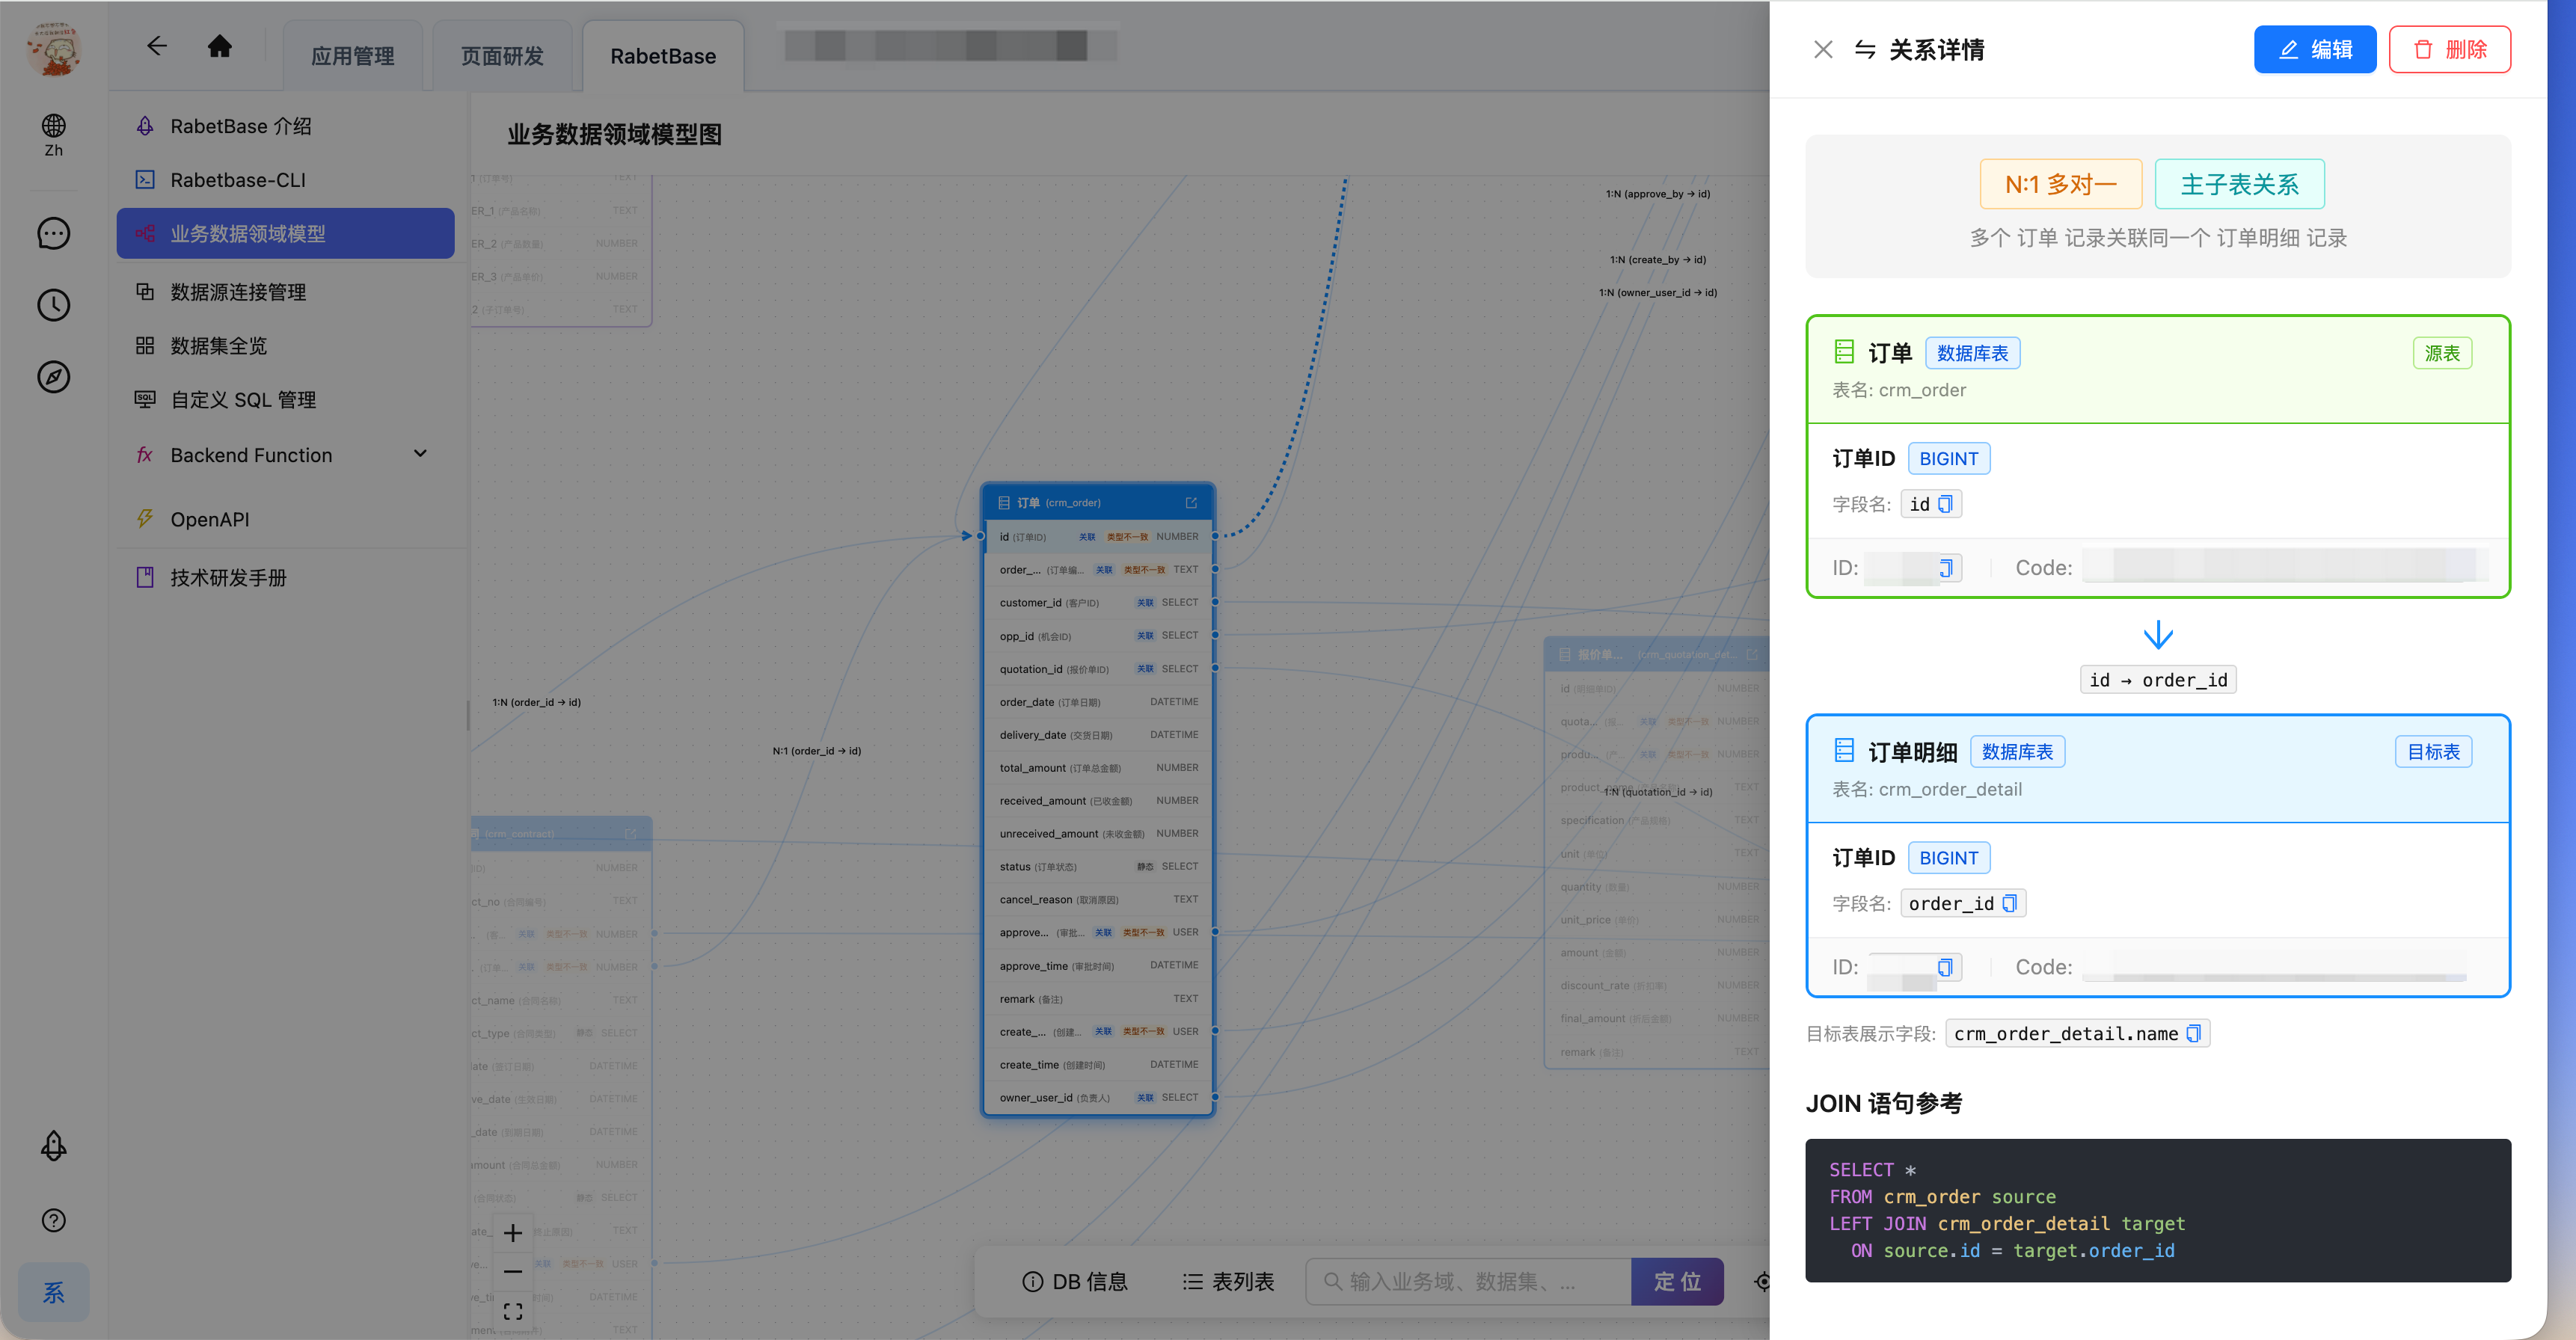
If the fields are named differently in your UI, pick by what the page actually says. What matters is that the semantics line up: the master field and the detail field must genuinely link to the same master record.
Step 5: Save and publish
When configuration is done, click Save and publish.
Screenshot: saving and publishing the master-detail relation
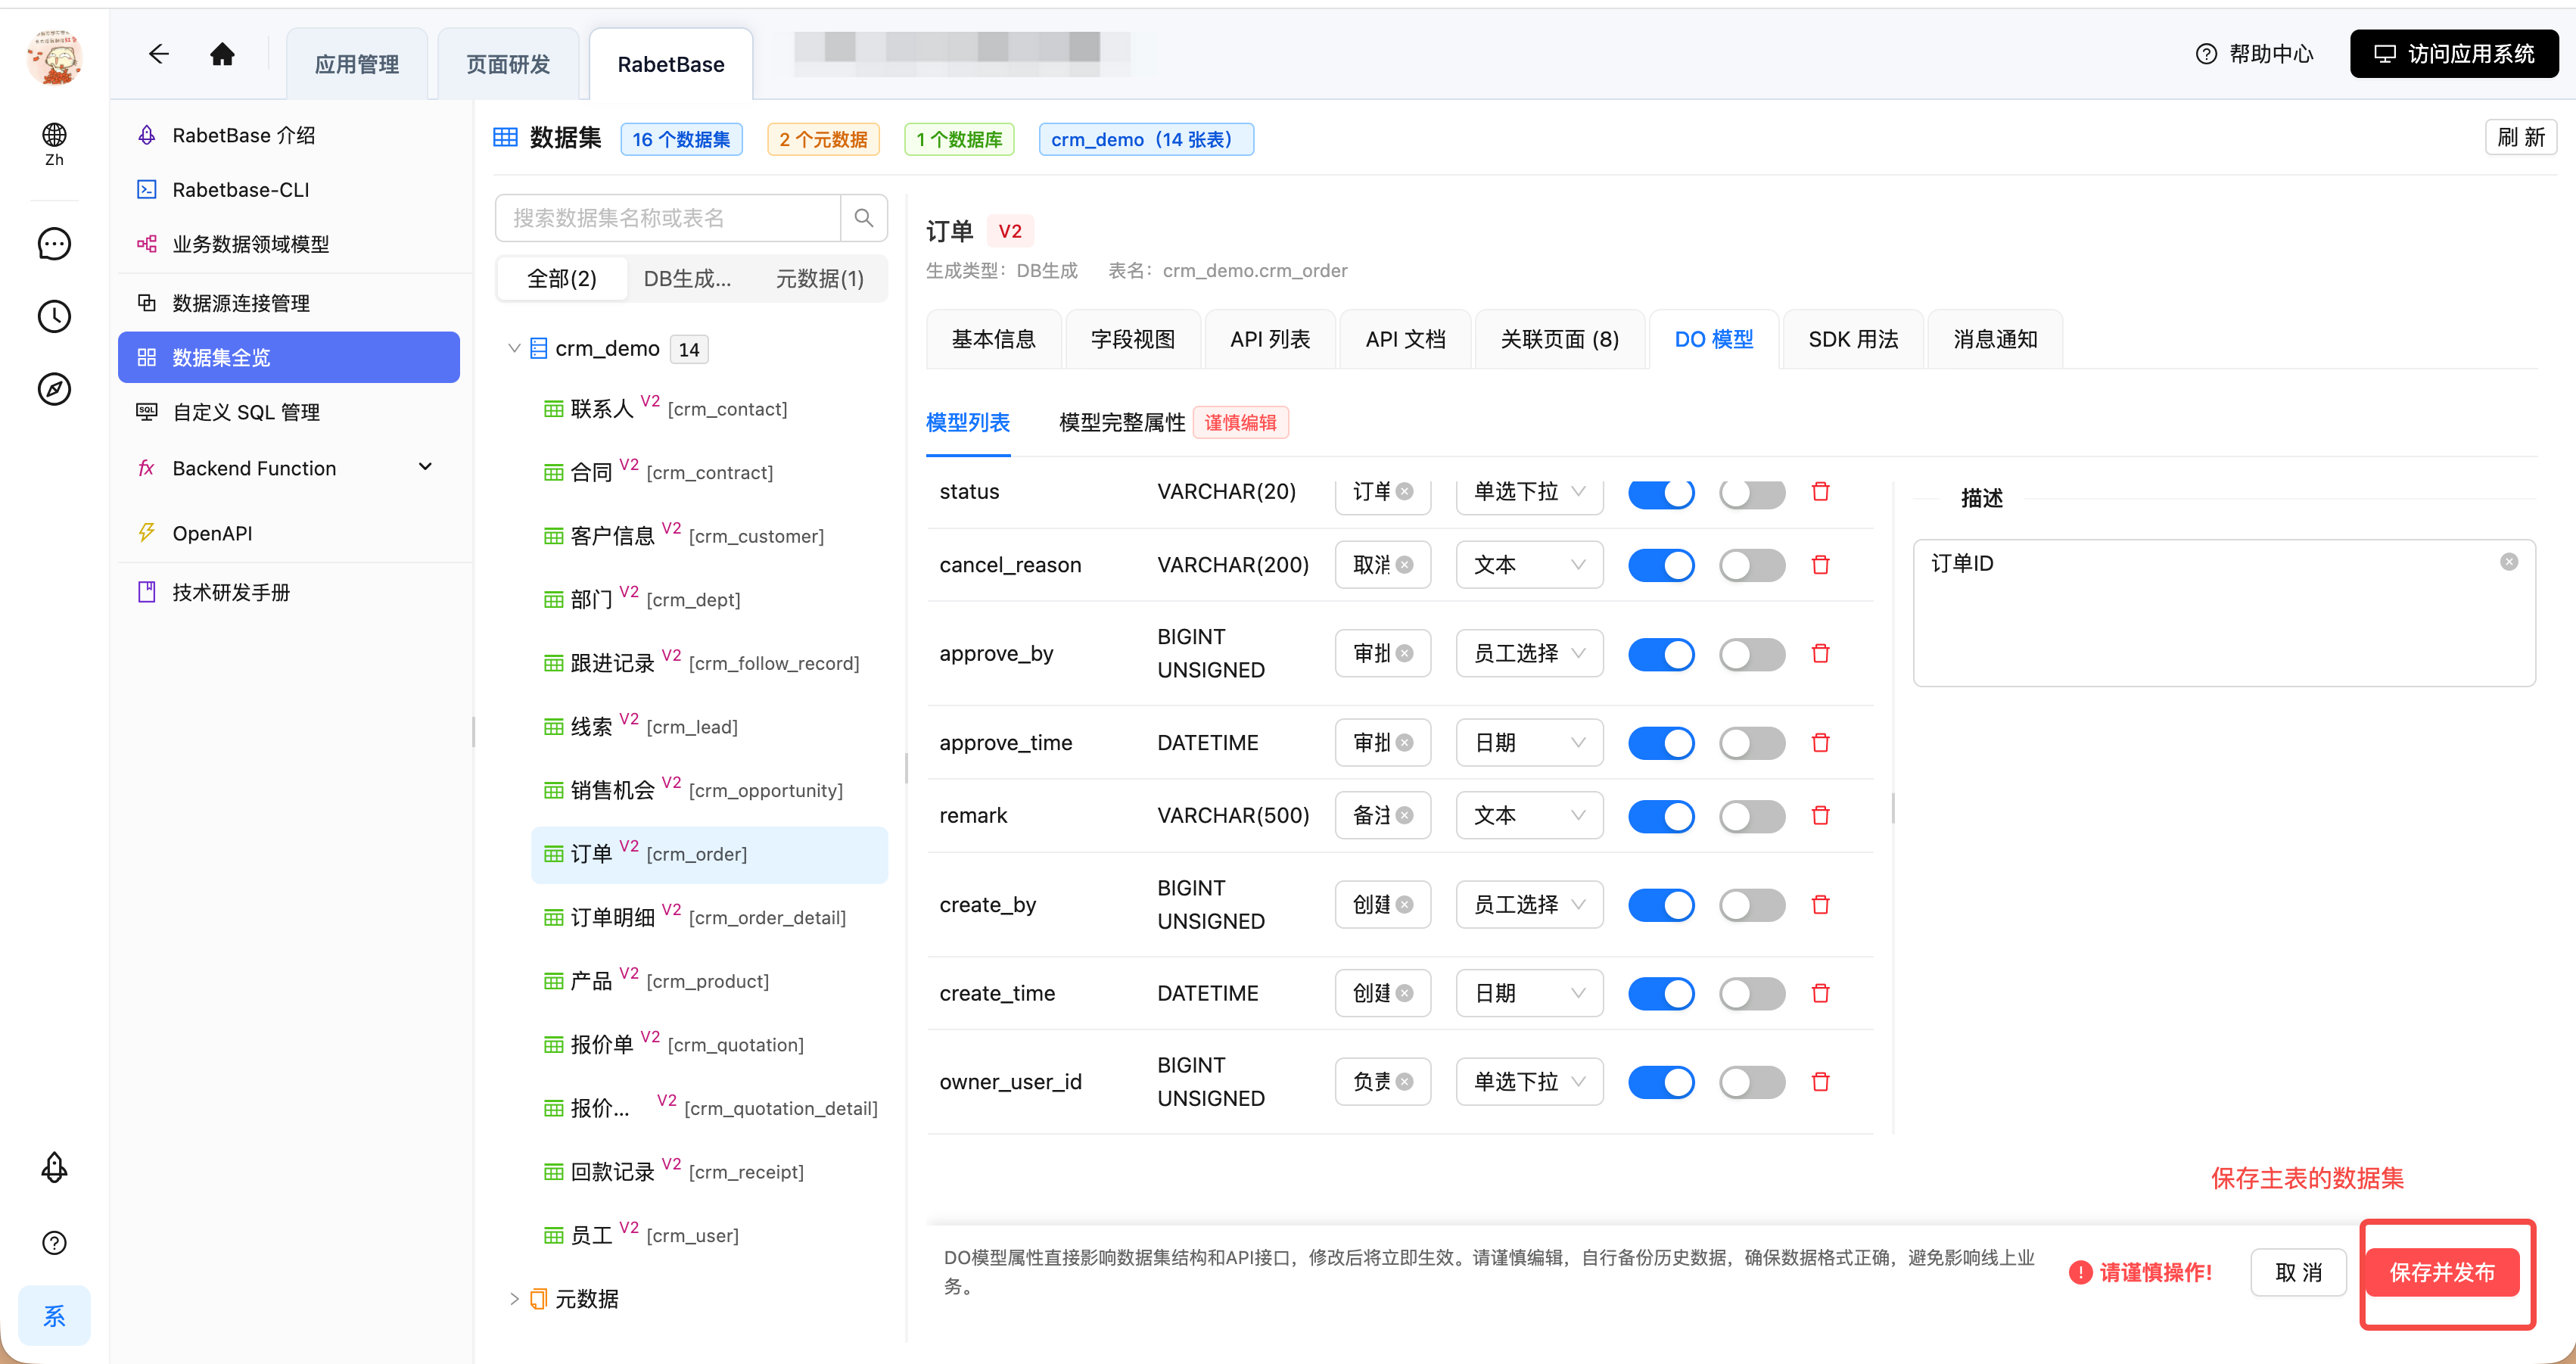
A draft save or a local-only change won't affect the live business page. After publishing, go back to the business page and verify that master and detail link as expected.
Step 6: Confirm detail preview, edit, and delete
After saving and publishing, open a master record and first confirm the detail area shows the details that actually belong to it.
If the current page template exposes detail-table actions, also verify that:
- After you edit a detail row, the change saves correctly
- After you delete a detail row, it no longer appears under the current master record
Whether the detail table supports editing and deleting depends on the page template and permission settings; the master-detail relation itself doesn't automatically enable these actions.
Screenshot: opening the detail table preview
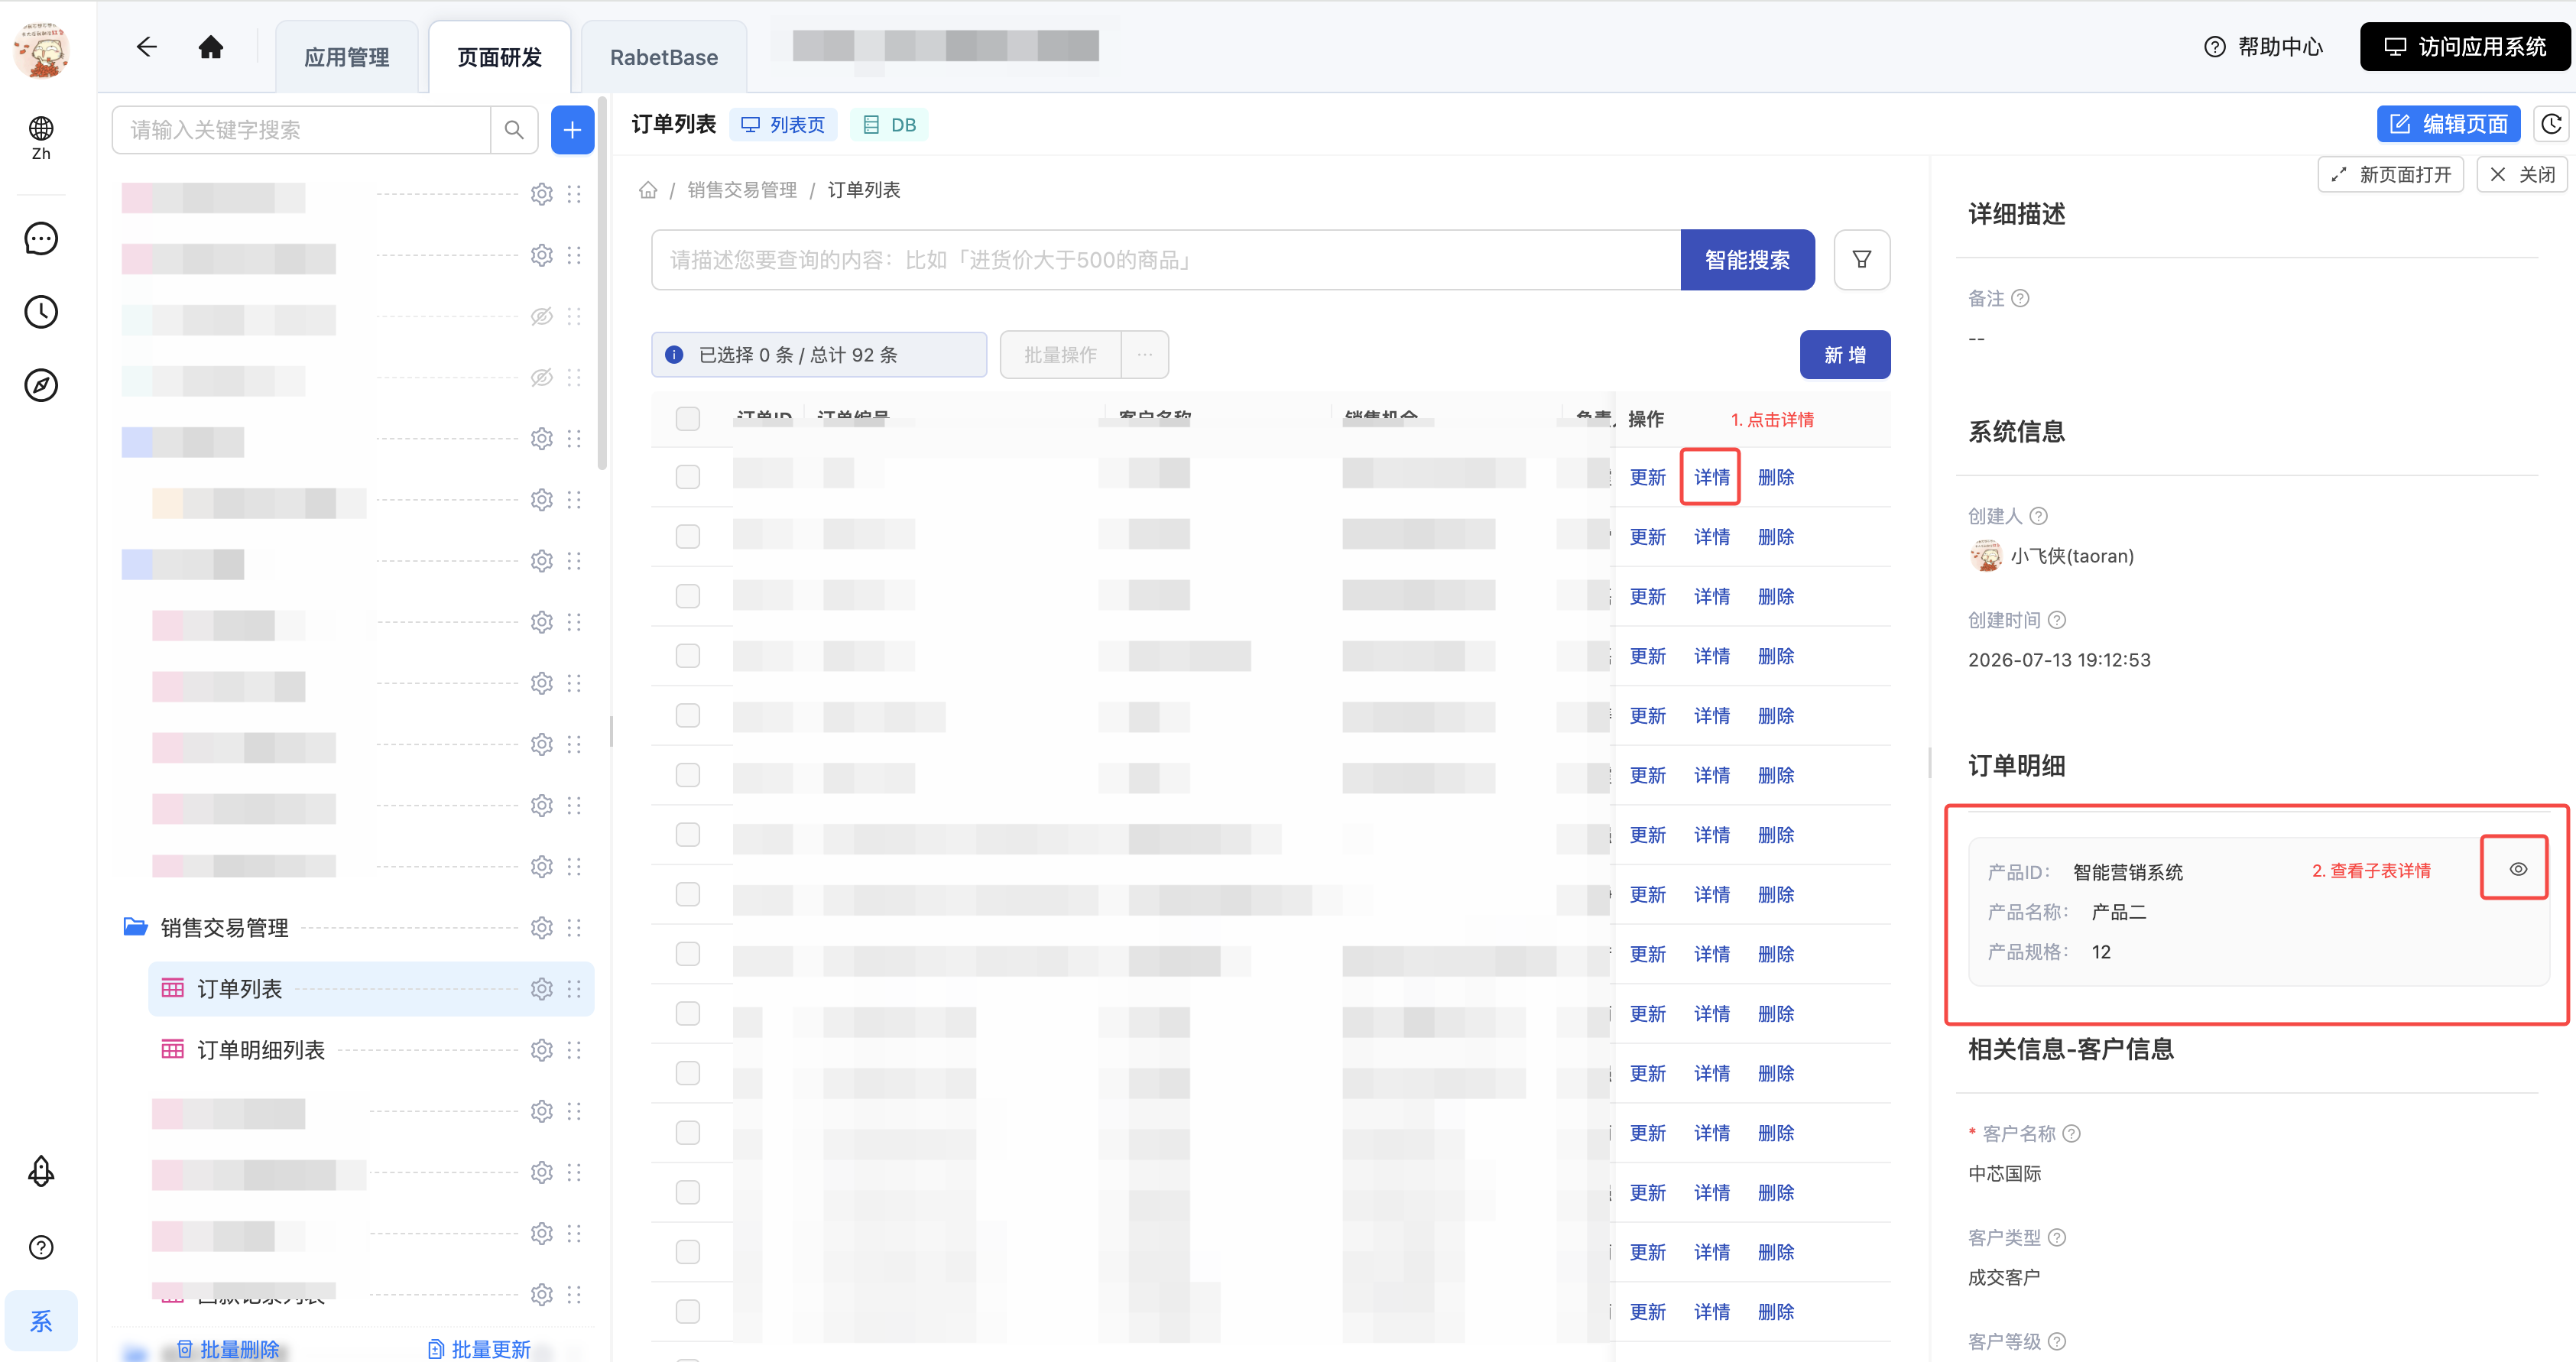
Screenshot: detail rows after opening the preview
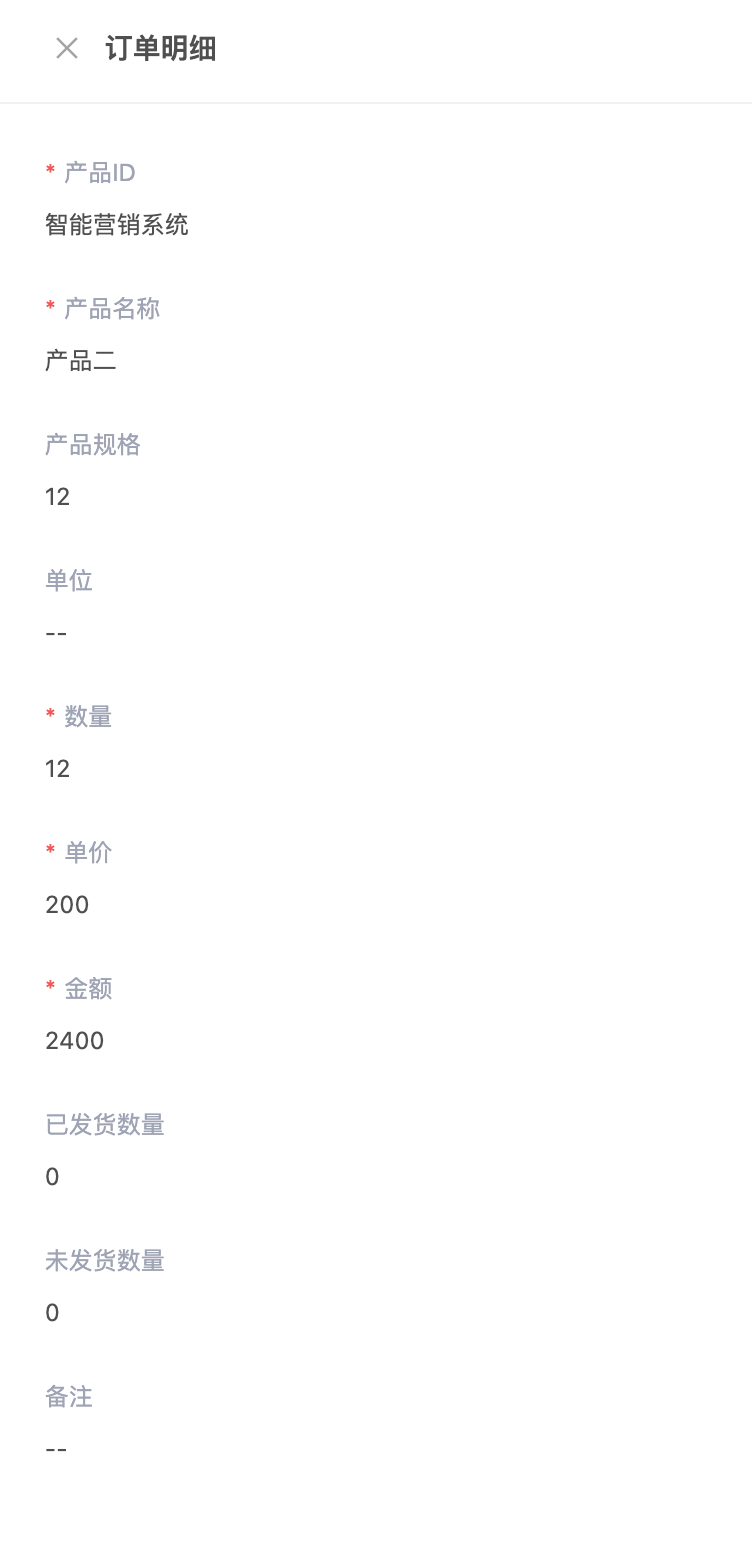
Screenshot: the detail row list
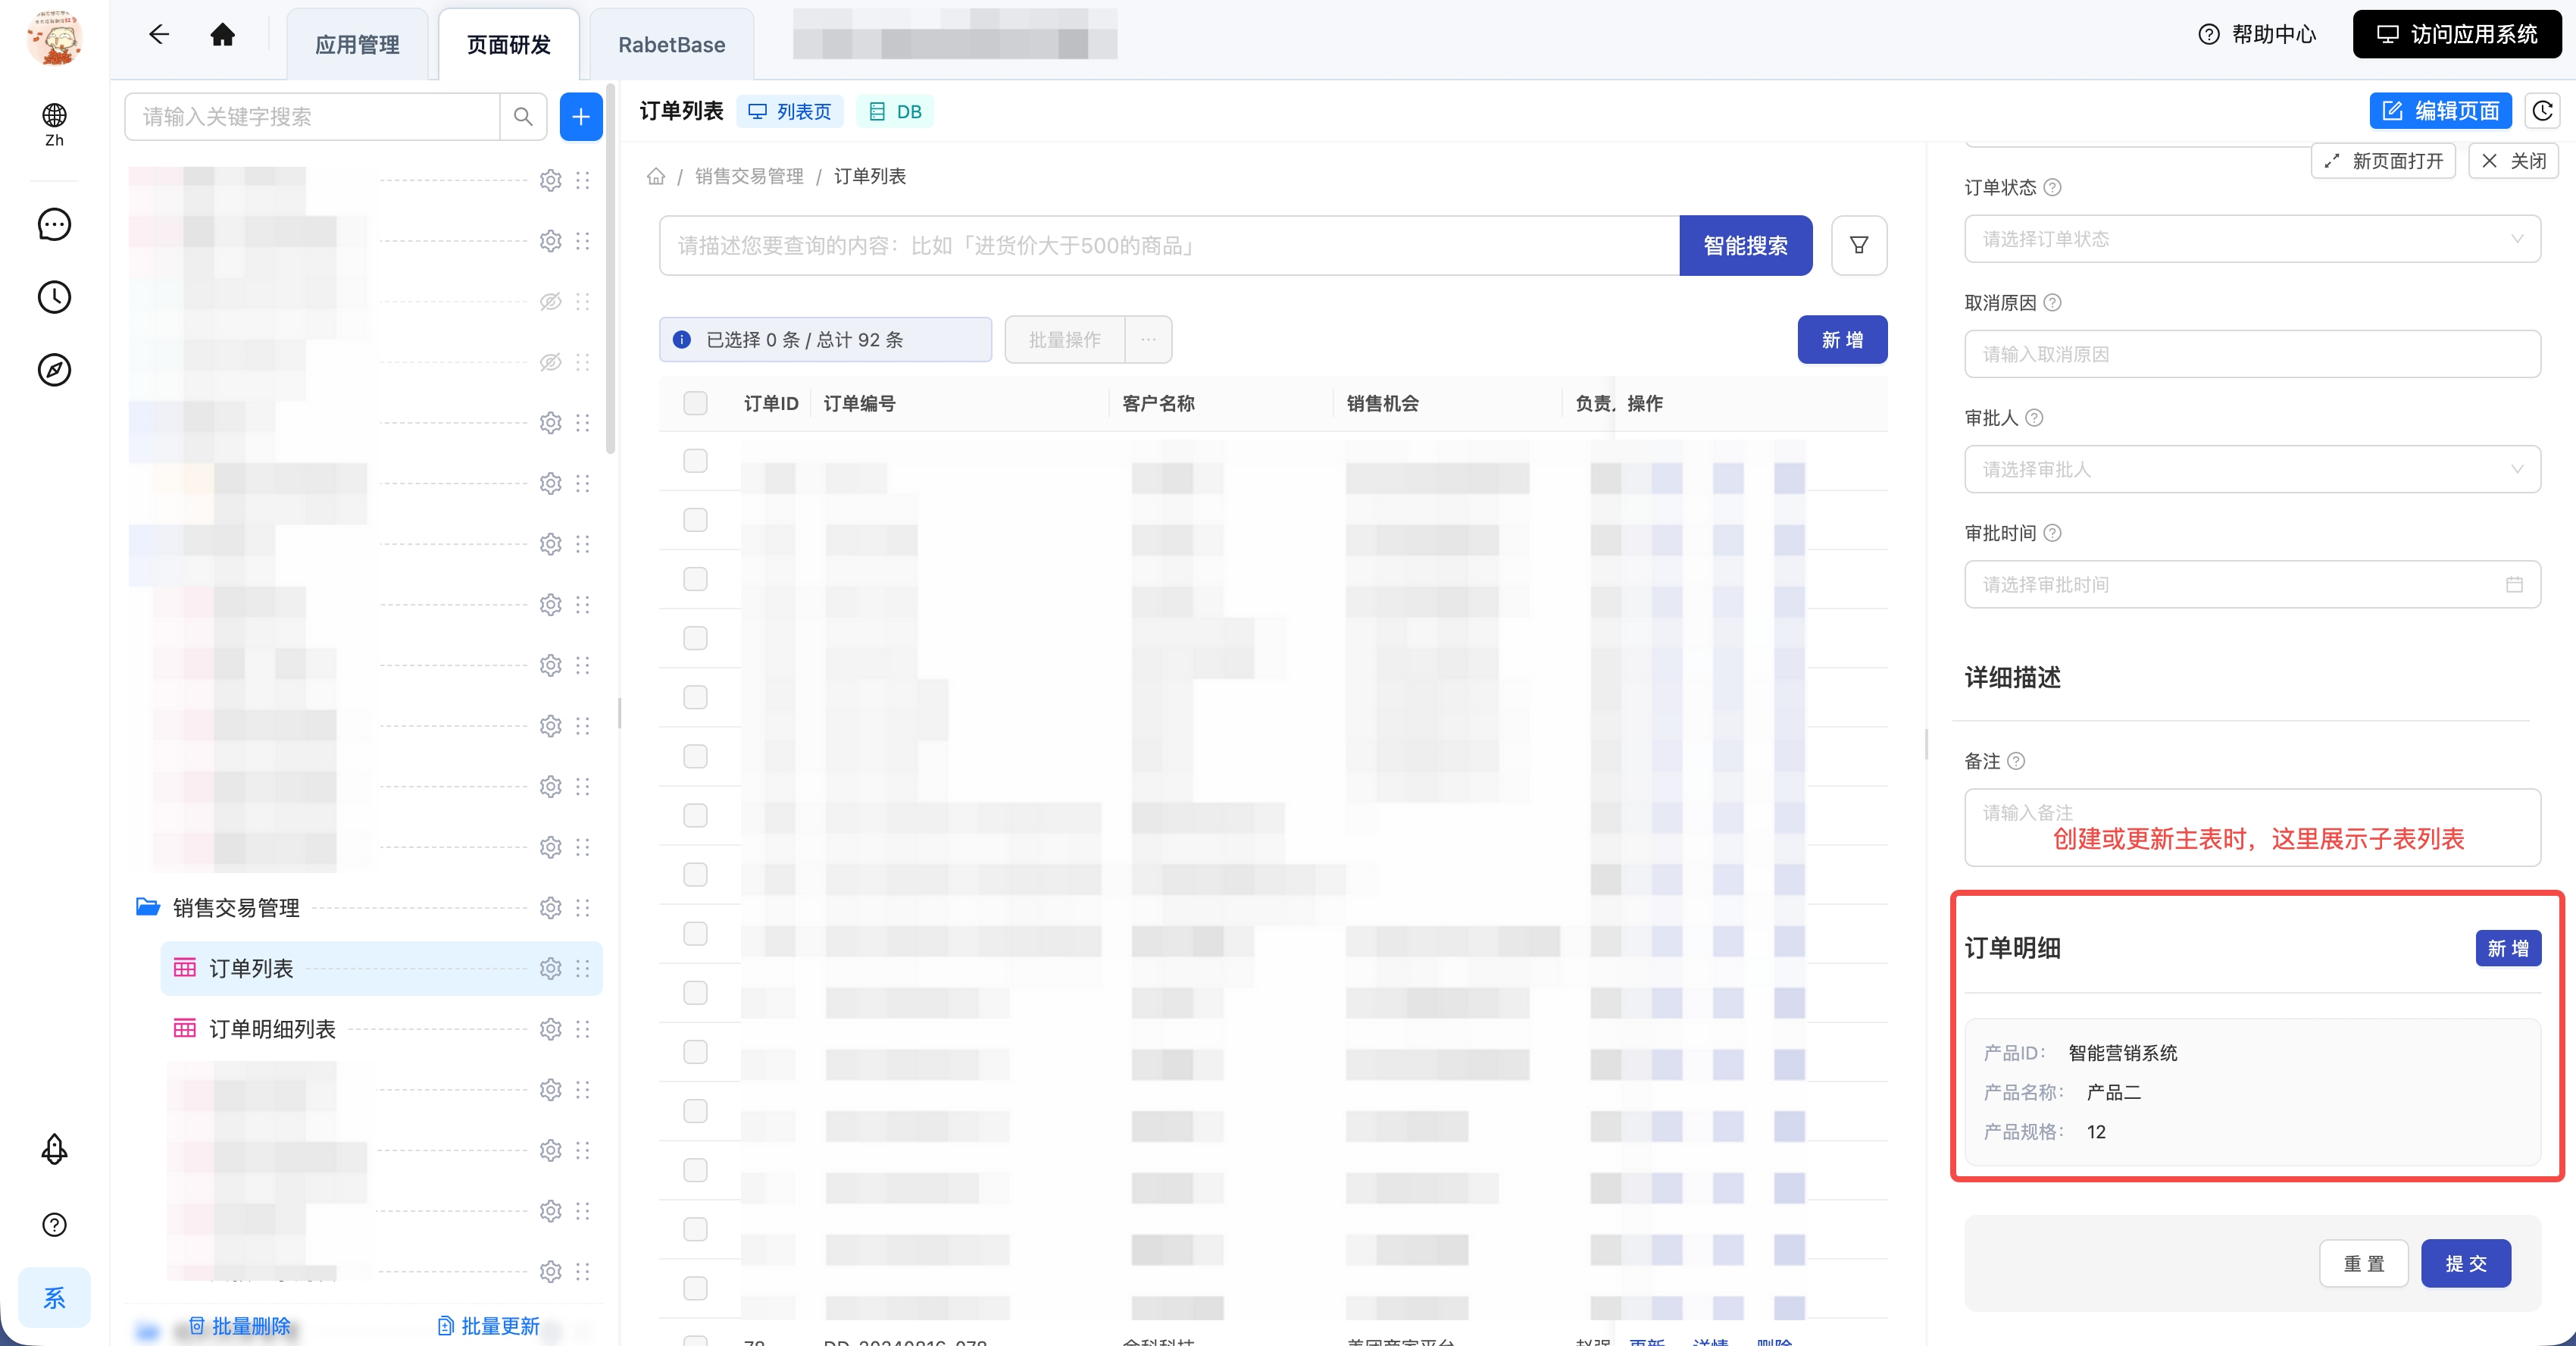
Screenshot: editing and deleting detail rows
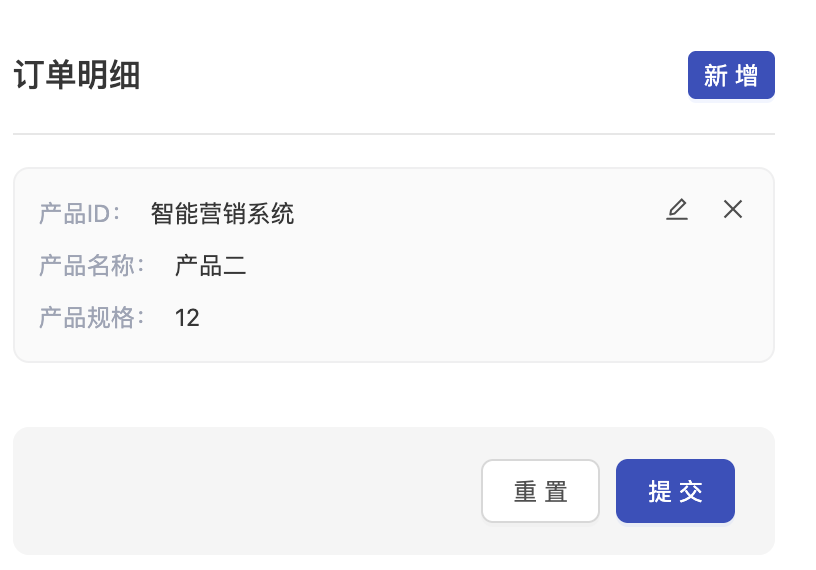
How master-detail behaves when creating master records
Once the master-detail relation is configured and published, a master page that supports master-detail creation usually shows two parts in its creation view:
- The master form: fills master fields such as order number and customer
- The detail rows area: adds one or more order items — e.g. product and quantity — within the same creation flow
On save, the detail rows attach to the master record being created; nobody has to link each row to an order by hand.
If the creation page shows only master fields with no detail area, the current page template doesn't yet support the master-detail creation layout. The master-detail relation defines data-model semantics — it doesn't generate the detail area automatically.
Screenshot: the base form when creating a master record
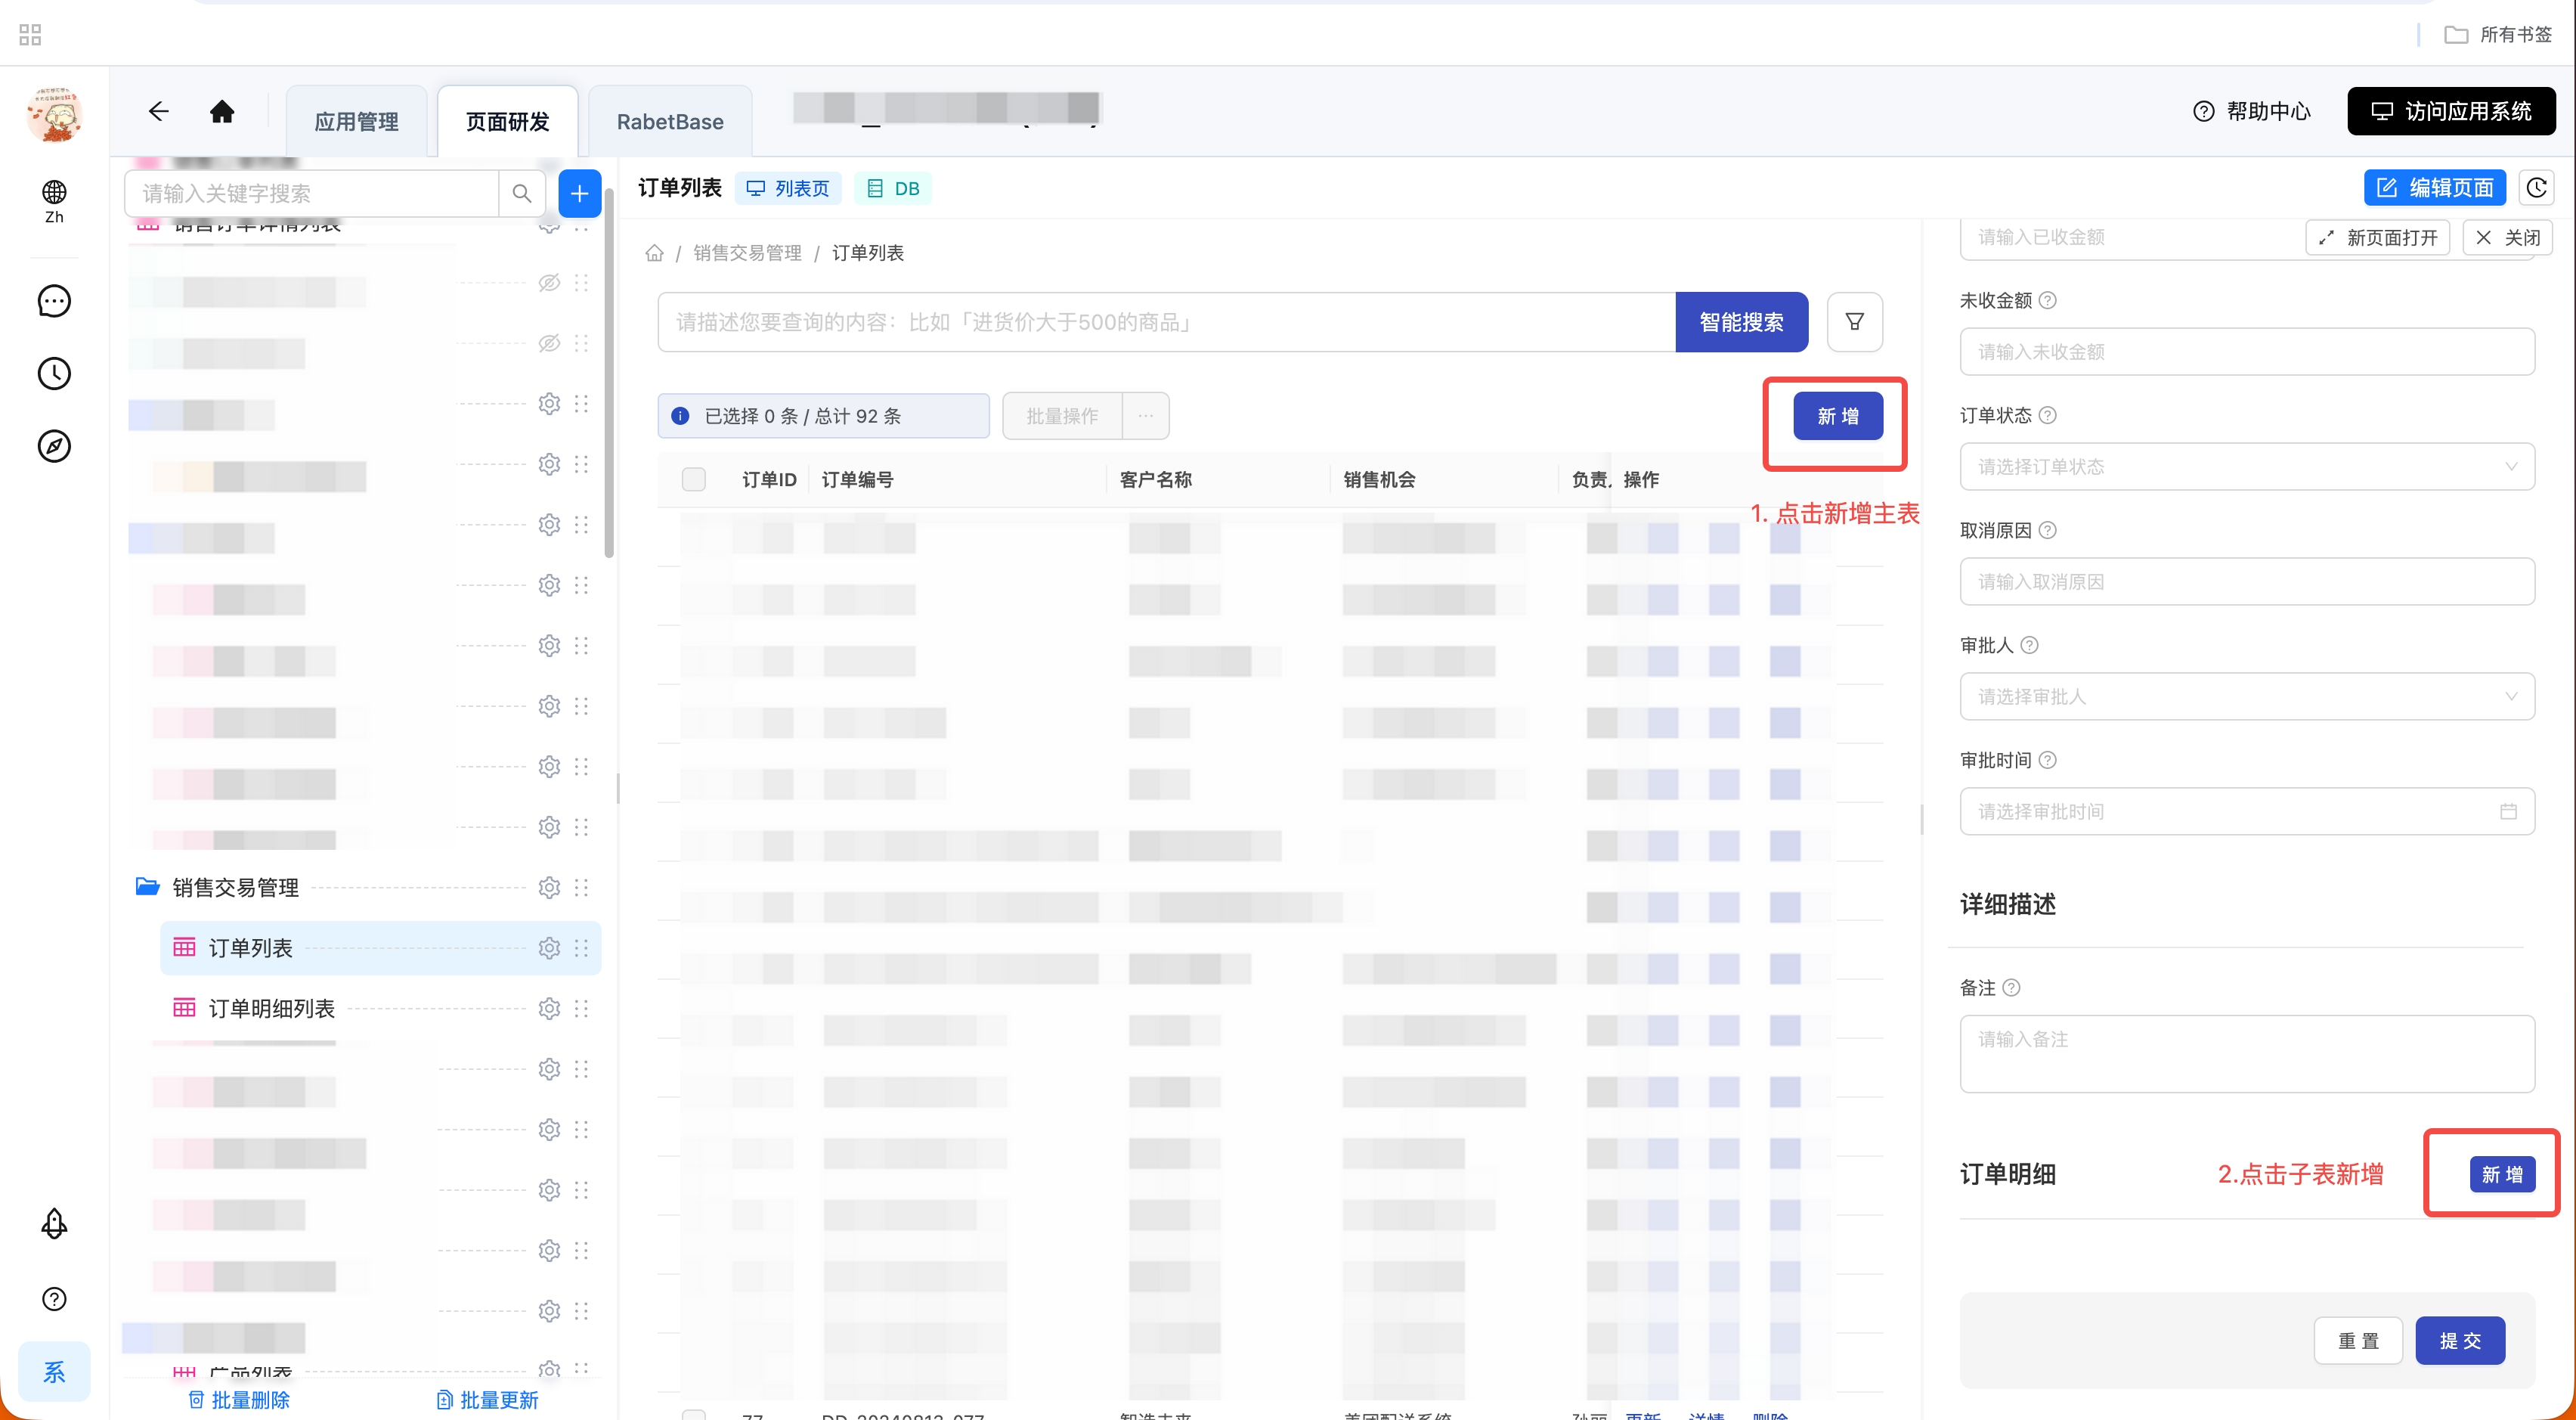
Screenshot: adding detail rows during creation
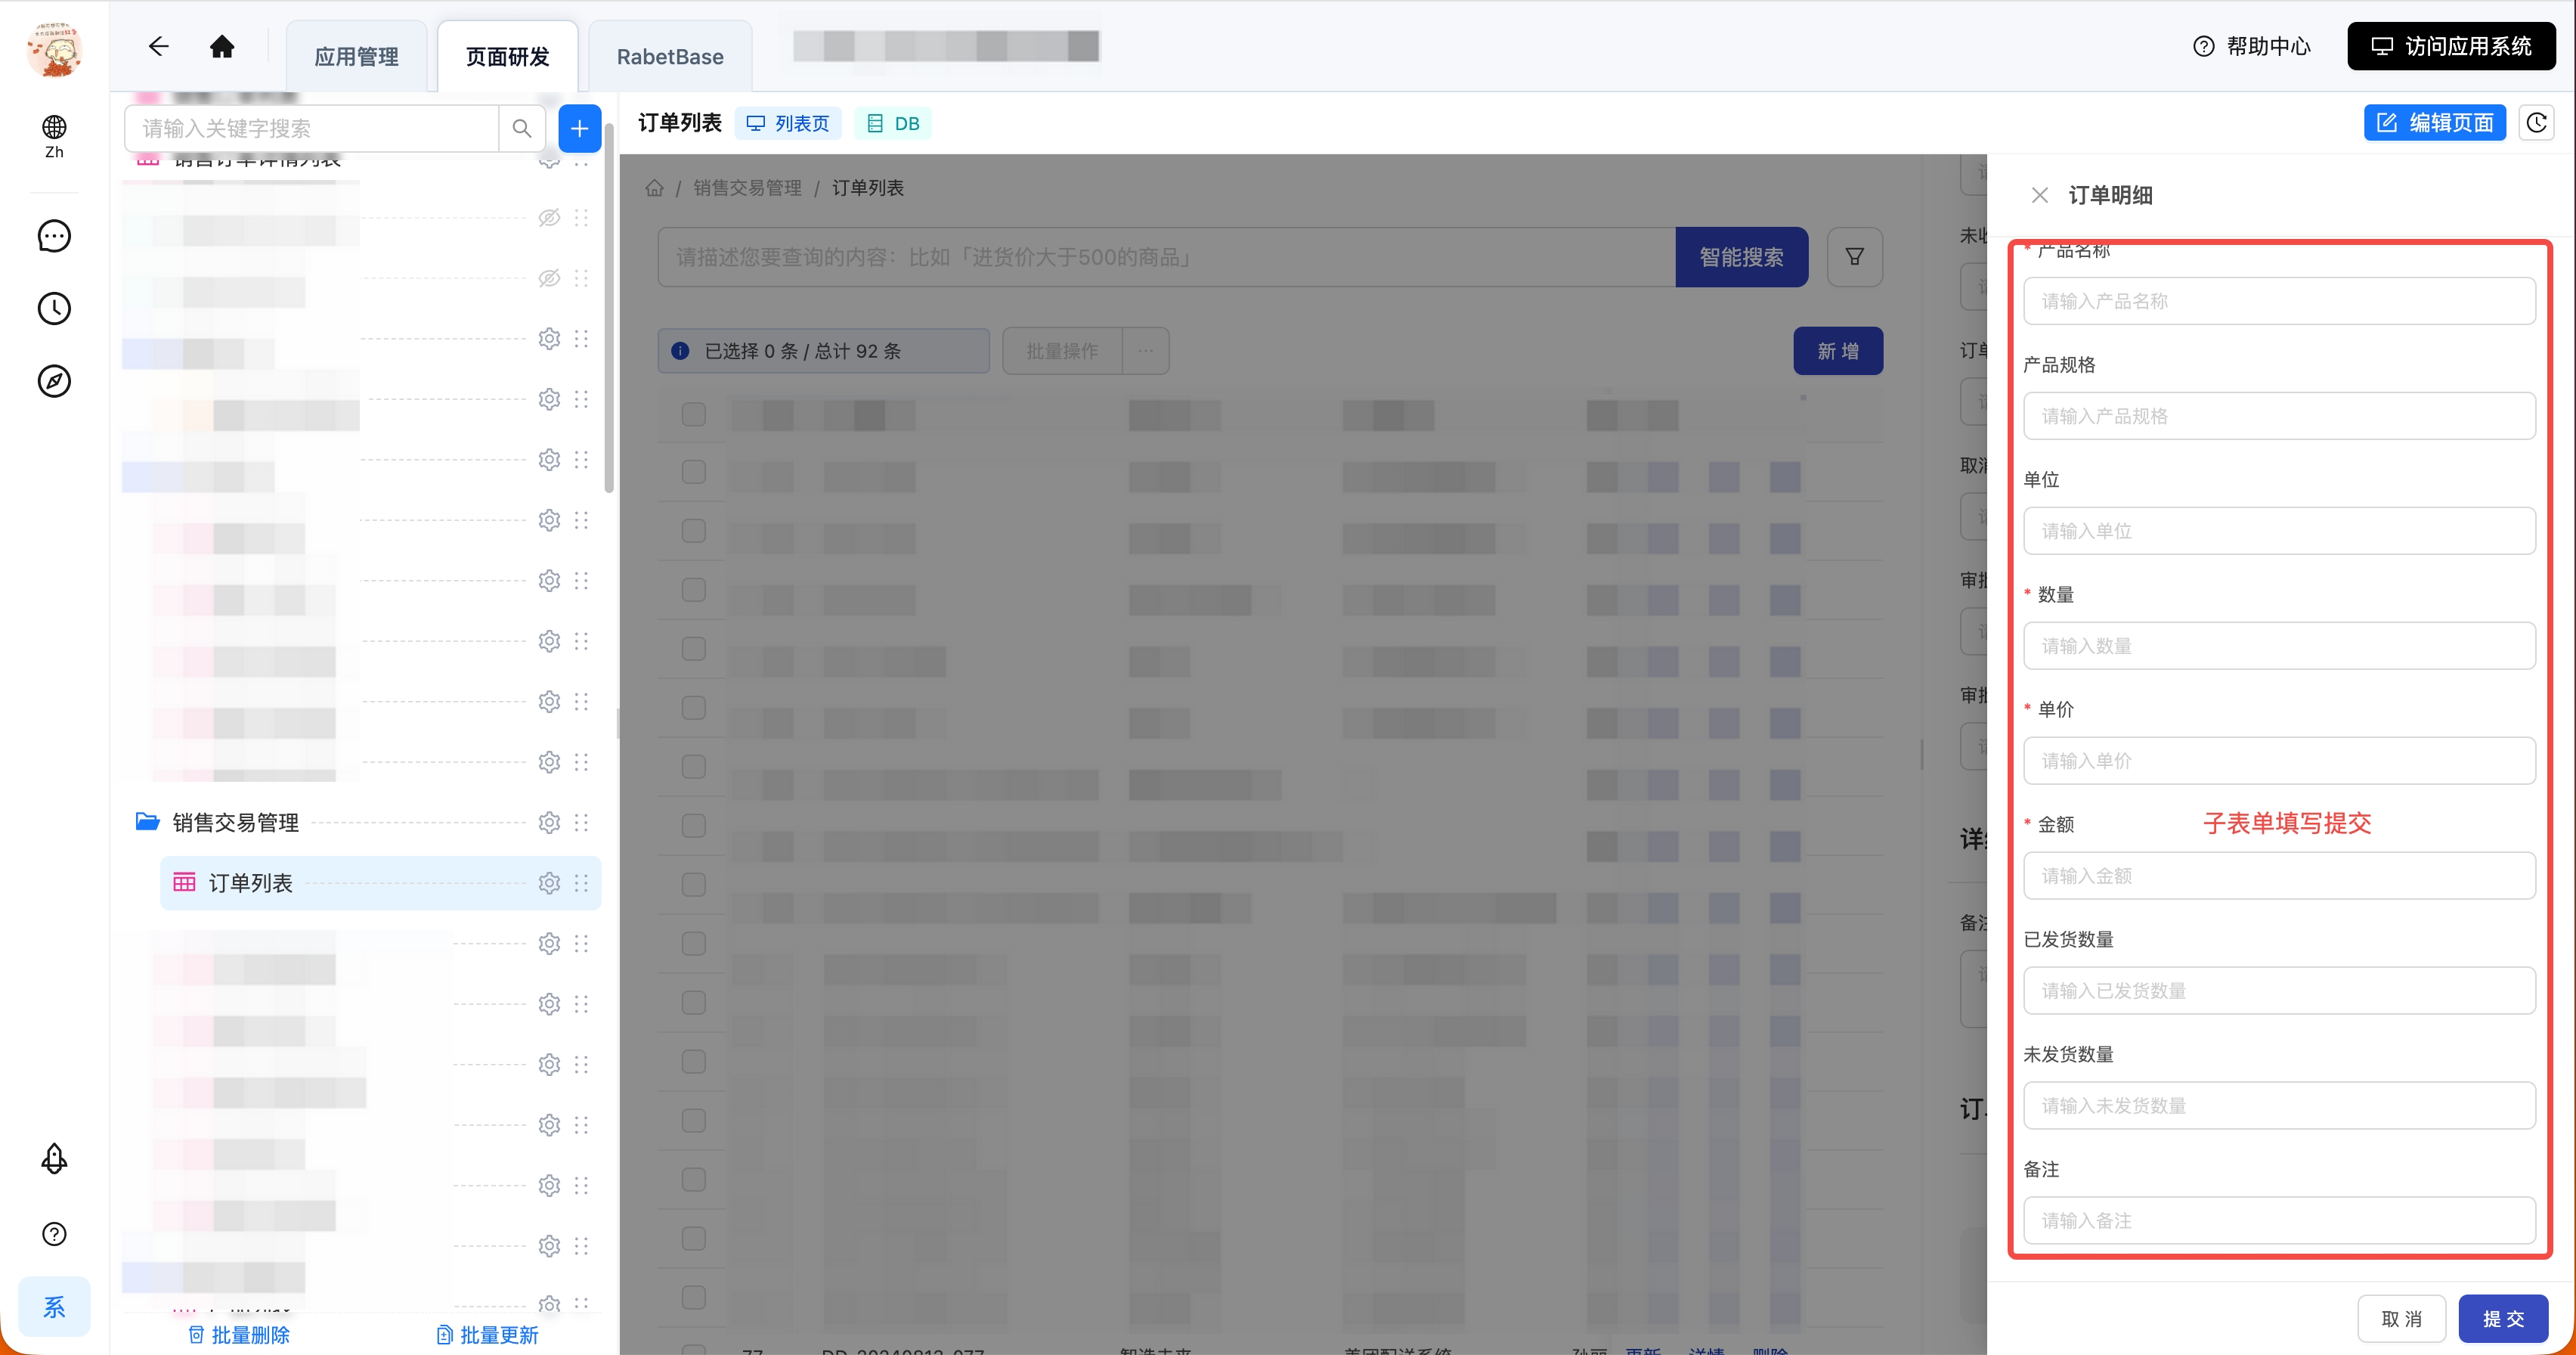
A complete example
Here is a minimal "order + order item" example.
Master table: order
| Field code | Field name | Description |
|---|---|---|
id | Order ID | Unique identifier of the master |
order_no | Order number | Business display number |
customer_name | Customer name | The ordering customer |
Detail table: order item
| Field code | Field name | Description |
|---|---|---|
id | Line item ID | Unique identifier of the detail |
order_id | Order ID | Points to the order master's id |
product_name | Product name | The product on this line |
quantity | Quantity | The quantity on this line |
Relation configuration:
| Setting | Example value |
|---|---|
fromDatasetCode | order |
fromField | id |
toDatasetCode | order_item |
toField | order_id |
cardinality | one_to_many |
bizRelationType | main_sub |
This configuration says: one order record can own many order items, and each item belongs to the order's id through order_id.
What each setting means
If the page shows Chinese form labels, just follow the wording on the page. If you're looking at JSON or platform field names, check them against this table:
| Field | Example value | Meaning | How to fill it in |
|---|---|---|---|
fromDatasetCode | order | Master dataset code | The current business entry table |
fromField | id | The master field being referenced | Usually the master primary key or another stable unique identifier |
toDatasetCode | order_item | Detail dataset code | The line-item table |
toField | order_id | The field on the detail table storing the master identifier | Must match fromField |
toFieldLabel | 订单 ID | Display name of the detail relation field | Fill in when the UI displays it or auto-generation needs it; when absent, the platform default applies |
cardinality | one_to_many | Cardinality | Master-detail should be one master record to many detail records |
bizRelationType | main_sub | Business relation type | Explicitly declares this relation as master-detail |
confidence | 1 | Relation confidence | Manually confirmed relations can keep the platform's default high confidence; don't use it as a substitute for verifying the fields |
sourceType | manual | Relation source | Differs across manual configuration, AI detection, and platform auto-generation; keep the actual source |
fromField and toField are the easiest to get backwards. The master field is the one the detail table references; the detail field is the one storing the master's identifier. Don't swap them.
How to reference relation fields in a data list page
Once the master-detail relation is configured, the table, filters, or detail area of a data list page reference relation fields with a single-level dot notation:
- List field:
relation.field - Filter field:
relation.field
You may see this pattern when an order page displays customer, line-item, or other related-object fields. The exact field names follow the page configuration and component semantics.
Notes:
- Use a single dot level only — don't write multi-level chains
- The field must actually exist and take part in the page's data fetching
- A master-detail relation doesn't auto-generate page layouts; display areas still follow what the page template supports
To confirm which field syntax the underlying components support, go back to page-schema and check the field semantics:
- Dataset relation declarations (master-detail fields and validation rules)
LrSmartTablerelation field referencesLrSmartFilterrelation field referencesPageSchemadot-notation field constraints
Final live verification
After publishing, verify with a real master record.
For an order:
- Open an order record
- Confirm its order items appear underneath
- Add or edit an item and confirm it belongs to this order
- Open a different order and confirm the previous order's items don't show
Focus on three things during verification:
- Details appear only under the right master record
- Adding a detail carries or selects the correct master record
- Relation fields render correctly in lists, detail views, and filters
If details don't show up after configuring, check these first:
- Are the master and detail tables swapped?
- Do the master field and detail field genuinely link?
- Is
cardinalityone-to-many? - Is
bizRelationTypemaster-detail (main_sub)? - Have you clicked
Save and publish?
Common mistakes
Mistake 1: configuring a plain reference as master-detail
An order referencing a customer doesn't mean customers and orders must be master-detail. Orders and customers are usually a plain reference; orders and order items are the master-detail pair.
Mistake 2: swapping the master and detail tables
Treating order items as the master and orders as the detail yields the wrong semantics — "one item with many orders". To find the master, look at the business entry point and the page's primary record, not at where fields sit.
Mistake 3: picking a display field as the relation field
order_no is an order number meant for display; order_id is far more likely the field in the line-item table pointing at the master. When configuring the relation, choose a field that links records stably — not a display name or number.
Mistake 4: changing the relation but not publishing
Without Save and publish, the live business page never updates. Same rule as every other page configuration guide.
Mistake 5: expecting the relation to build the whole page layout
The master-detail relation only tells the platform how the two tables relate. Whether details appear, where, and whether they can be added or edited depends on the current page template and component configuration.
The decision sequence to remember
- Is it "one master record with many detail records" in the business?
- Does the detail table have a field storing the master record's identifier?
- Do the master field and detail field genuinely link?
- Is the cardinality one-to-many and the business relation type master-detail?
- After the change, did you
Save and publishand verify on the business page?